Introduction
The file attachment of ServiceNow works on record level.It doesnt allow us to manage attachment at field level.In one of my client requirement it was nesscary to manage files at field level and at the same time it should be unobtrusive and managed centrally.
Lets see why OOTB we were unable to leverage and what custom solution we build
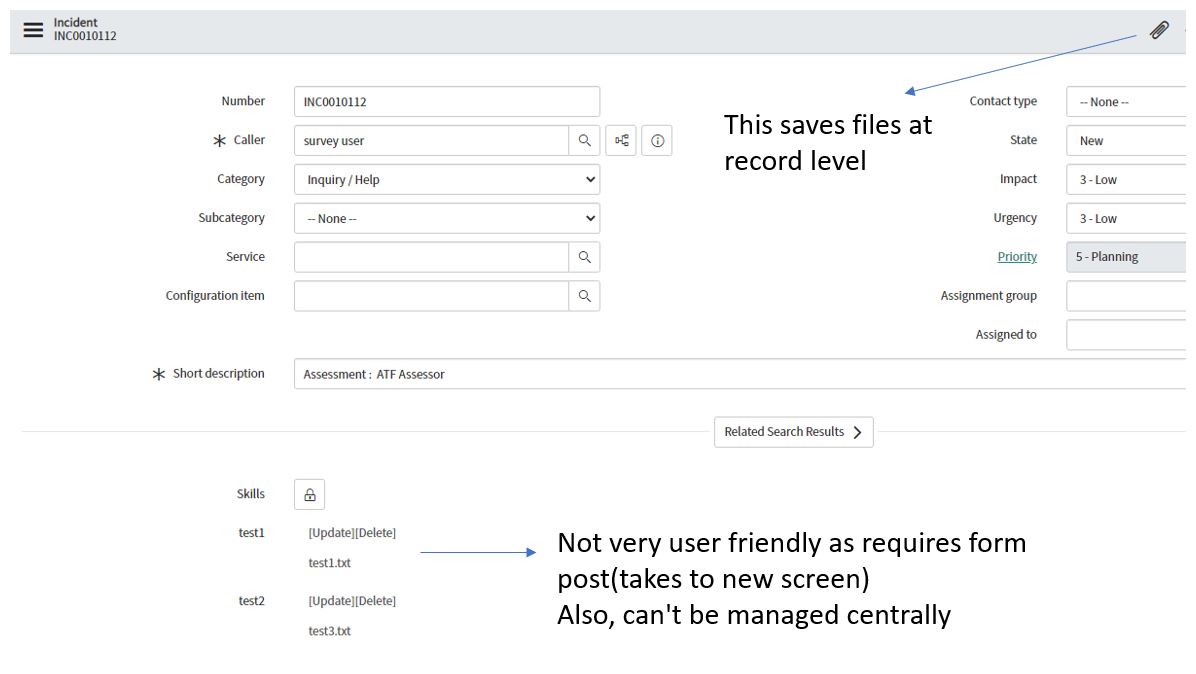
As we can see here
- the global attachment cant track files at field level
- the one that is at field level doesnt have a single pane to manage globally
So we build a custom solution that can manage things centrally.Because this is a widget we can add in Native UI as well as in service portal. The code is completely resuable, all you need to do is to mention the field names and it should work.
this will be the end result

Little bit on file attachment
files are stored in sys_attachment table. files which are prefixed with ZZ_YY are not global scoped.
in other words to map a file in attachment table to a field in a record ( let say incident) we have save the file with ZZ_YY scoped and then associate the file sysid to record field.
files are written using GlideSysAttachment api with content type, name
	var attachment = new GlideSysAttachment();
	var DecodedBytes = GlideStringUtil.base64DecodeAsBytes(rawfile);
	var fileSysId = attachment.write(record, fileName, contentType, DecodedBytes);
The widget
HTML
you can use this as it is, no change required. If you would like to customise the UI further this is place you should look into. Basically this loops over the file list send from the server
if you observe bit carefully there is a custom ng-directive used here. file-model.
In ServiceNow custom ng-directives can be written inside Angular Providers.We are going to write one here too.
<div>
<!-- your widget template -->
<div class="panel panel-default">
<div class="panel-heading">
<i class="fa fa-folder" aria-hidden="true"></i> Attachments
</div>
<div class="panel-body">
<div ng-repeat="fileInput in data.fileList">
<lable class="field_selector"> <i class="fa fa-file" aria-hidden="true"></i>
</lable> <a class="hyperlink-selector" ng-href="">
</a> <label class="file_selector">
<input type="file" file-model="fileObj" ng-disabled="loader[$index]" style="display:none" />
<i class="fa fa-paperclip fa-rotate-90 fa-lg" aria-hidden="true"></i>
</label> <button class="upload_selector" ng-disabled="loader[$index]" ng-click="uploadFile('fileObj' + $index,$index)">
<i class="fa fa-upload fa-lg" aria-hidden="true"></i>
</button> <span ng-show="banner[$index]" class='label label-default label-file-info'>
<b></b> [ bytes] </span> <span ng-show="loader[$index]">
<i class="fa fa-spinner fa-spin fa-lg" aria-hidden="true"></i>
</span>
</div>
</div>
</div>
</div>
CSS
Little bit of styling :)
.label-file-info {
    font-size: 85%;
    color: black;
    font-weight: normal;
    font-style: italic;
  }

.file_selector:hover  {
    cursor: pointer;
    background-color: aliceblue;
  }

.upload_selector:hover  {
    cursor: pointer;
    background-color: aliceblue;
    border: white;
  }

.upload_selector  {
    cursor: pointer;
    background-color: white;
    border: aliceblue;
    color: brown;
  }

.field_selector {
    font-weight: normal;
    font-size: 95%;
  }

.hyperlink-selector {
     font-size: 90%;
  }

.label-default {
    background-color: Lavender;
}
filemodel
Goto Angular Providers and select type as Directive and paste below code.
function($parse) {
    return {
        restrict: 'A',
        link: function(scope, element, attrs) {
            var model, modelSetter;

            attrs.$observe('fileModel', function(fileModel) {
                model = $parse(attrs.fileModel);
                modelSetter = model.assign;
            });

            element.bind('change', function() {
                scope.$apply(function() {
                    modelSetter(scope.$parent, element[0].files[0]);
                    scope.banner[scope.$index] = element[0].files[0];
                });
            });
        }
    };
}
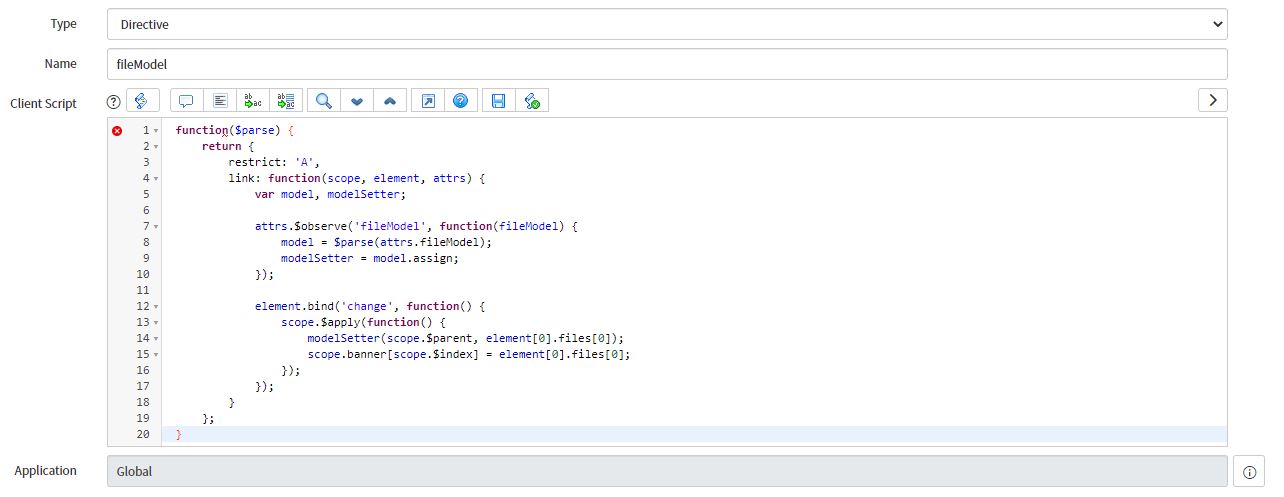
dont worry if it shows syntax error at the first line. Its just that editor not able to understand.
Client controller
The basically writes the functionality for file upload.Notice that there is a factory method here.
Again we can write Factory class in SNOW inside angular providers
function($scope, $http, spUtil, $cookies, fileReader) {

    var c = this;
    $scope.banner = [];
    $scope.loader = [];

    $scope.uploadFile = function(filename, index) {

        var file = $scope[filename];
        fileReader.readAsDataURL(file, $scope)
            .then(function(result) {

                var pieces = result.split(/[\s,]+/);
                $scope.data.fileRaw = pieces[pieces.length - 1];
                $scope.data.fileContentType = file.type
                $scope.data.filename = file.name;
                $scope.data.field = $scope.data.fileList[index].field;
                $scope.loader[index] = true;

                spUtil.update($scope).then(function(data) {
                    $scope.loader[index] = false;
                    $scope.banner[index] = '';
                });
            });

    };
}
fileReader
Goto Angular provider and add a new provider as below. Note that fileReader is of type factory.
function fileReader($q, $log) {

    return {

        onLoad: function(reader, deferred, scope) {
            return function() {
                scope.$apply(function() {
                    deferred.resolve(reader.result);
                });
            };
        },

        onError: function(reader, deferred, scope) {
            return function() {
                scope.$apply(function() {
                    deferred.reject(reader.result);
                });
            };
        },

        onProgress: function(reader, scope) {
            return function(event) {
                scope.$broadcast("fileProgress", {
                    total: event.total,
                    loaded: event.loaded
                });
            };
        },

        getReader: function(deferred, scope) {
            var reader = new FileReader();
            reader.onload = this.onLoad(reader, deferred, scope);
            reader.onerror = this.onError(reader, deferred, scope);
            reader.onprogress = this.onProgress(reader, scope);
            return reader;
        },

        readAsDataURL: function(file, scope) {
            var deferred = $q.defer();

            var reader = this.getReader(deferred, scope);
            reader.readAsDataURL(file);

            return deferred.promise;
        }

    };

}
Server side
The key here is the pass the field names inside the fileTypeFields type array.Look at the writeFile method where we are saving the file as bytes.You can further customize the getRecords method for additional business logic filters. For example show fields based on specific assigment group etc.
the tablename and tablesysid need to be passed for the widget to get the context. For example in an incident record this will be incident and the record sysid respectively
(function() {

	var tablename = $sp.getParameter('table');
	var tablesysid = $sp.getParameter('sys_id');
	var fileTypeFields =  ["u_test1","u_test2"];

	data.tablename = tablename;
	data.tablesysid = tablesysid;
	data.fileRaw = '';
	data.fileContentType = '';
	data.filename = '';
	data.field = '';
	data.fileList = getRecords(fileTypeFields);

	if (input && input.field) {
		var tblRecIn = new GlideRecord(tablename);
		tblRecIn.addQuery('sys_id', tablesysid);
		tblRecIn.query();
		if (tblRecIn.next()) {
			var fileName = input.filename;
			var contentType = input.fileContentType;
			var rawFile = input.fileRaw;
			var field = input.field;
			deleteFile(tblRecIn[field]);
			var fileSysId = writeFile(tblRecIn, fileName, contentType, rawFile);
			tblRecIn[field] = fileSysId;
			tblRecIn.update();
			data.fileList = getRecords(fileTypeFields);
		}
	}

	function writeFile(record, fileName, contentType, rawfile) {
		var attachment = new GlideSysAttachment();
		var DecodedBytes = GlideStringUtil.base64DecodeAsBytes(rawfile);
		var fileSysId = attachment.write(record, fileName, contentType, DecodedBytes);
		var attachmemtObject = new GlideRecord('sys_attachment');
		attachmemtObject.addQuery('sys_id', fileSysId);
		attachmemtObject.query();
		if (attachmemtObject.next()) {
			attachmemtObject.table_name = "ZZ_YY" + attachmemtObject.table_name;
			attachmemtObject.update();
		}
		return fileSysId;
	}

	function deleteFile(fileSysId) {
		var attachmemtObject = new GlideRecord('sys_attachment');
		attachmemtObject.addQuery('sys_id', fileSysId);
		attachmemtObject.query();
		if (attachmemtObject.next()) {
			attachmemtObject.deleteRecord();
		}
	}

	function getRecords(fileTypeFields) {
		var fileList = [];
		var tblRec = new GlideRecord(tablename);
		tblRec.addQuery("sys_id", tablesysid);
		tblRec.query();
		if (tblRec.next()) {
			var custType = tblRec.u_customer_type.toString();
			for (var i = 0; i < fileTypeFields.length; i++) {
					fileObject = {};
					fileObject.field = fileTypeFields[i];
					fileObject.fieldname = tblRec[fileTypeFields[i]].getLabel();
					fileObject.filename = tblRec[fileTypeFields[i]].getDisplayValue();
					fileObject.filesysid = "sys_attachment.do?sys_id=" + tblRec[fileTypeFields[i]] + "";
					fileList.push(fileObject);
			}
		}
		return fileList;
	}

})();
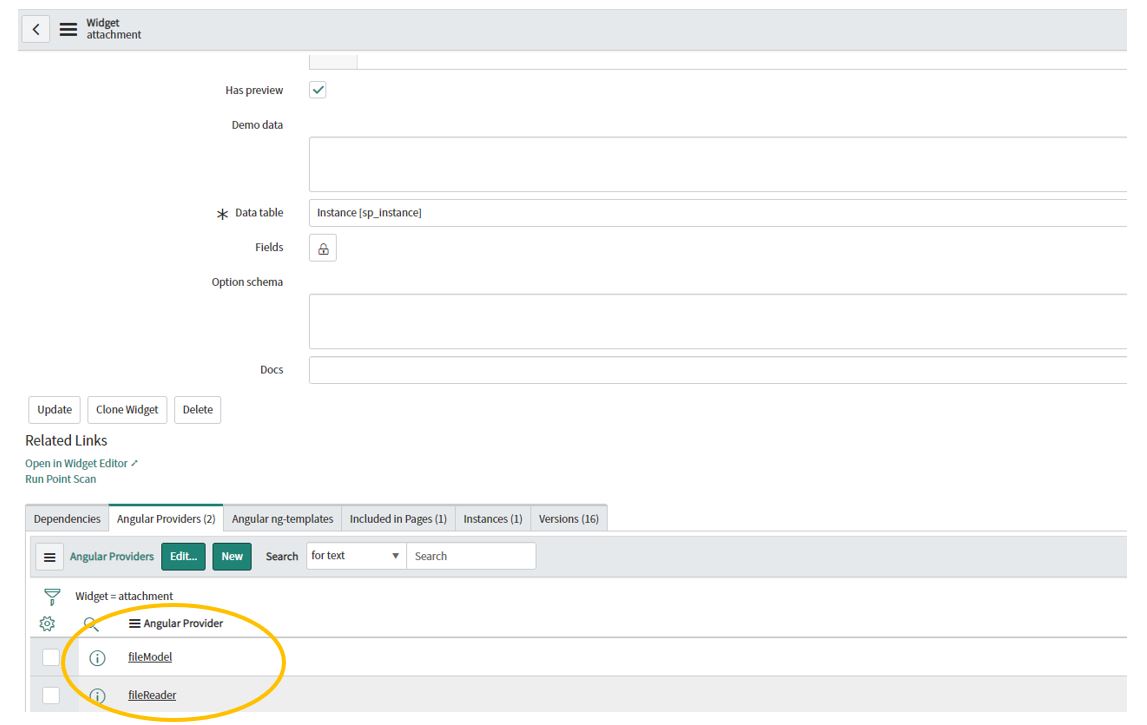
Associate the widget with the Angular providers
Finally we have to associate the angular providers with the widget we just created so that it understand the custom directives.
Testing the Widget
Simplest way to test is to create a SP page and add this as a widget.
once added we can pass any tabel (say incident) and a record (sysid) to test
https://devXXXX.service-now.com/sp?id=testattch&table=incident&sys_id=552c48888c033300964f4932b03eb092
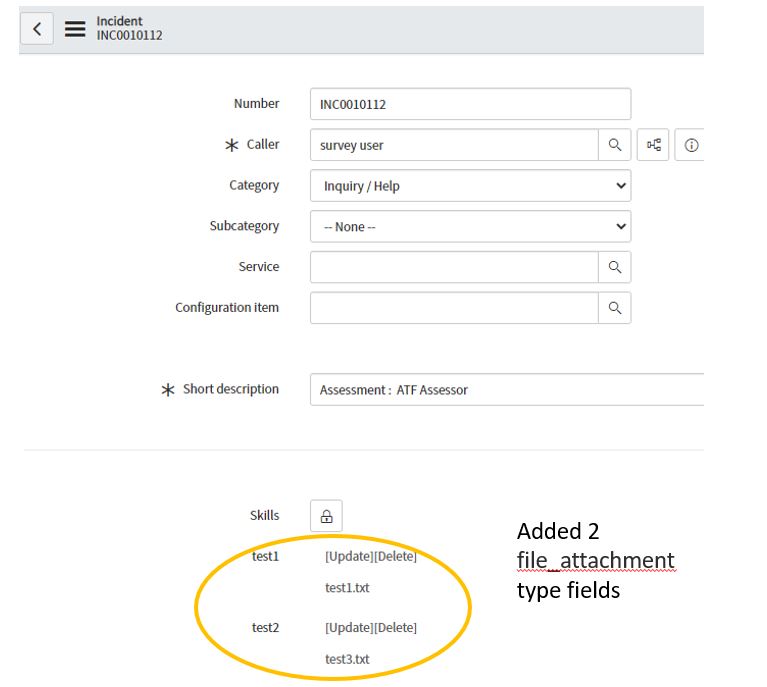
Note that the module should have at least 1 field of type file for this to reflect.I added 2 attachment type fields in incident table
this will be end result

like this we can add it in any portal page.
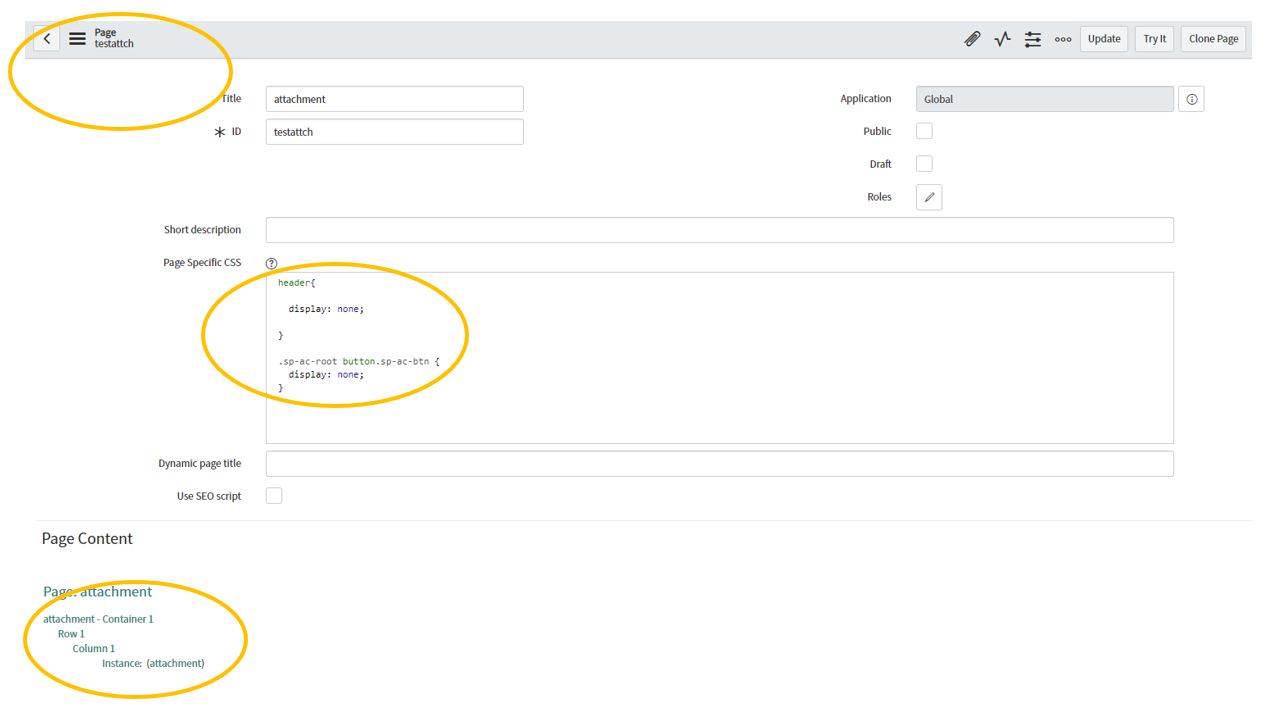
Also note you can hide the header content using simple CSS below
header{

  display: none;

}

.sp-ac-root button.sp-ac-btn {
  display: none;
}
Adding the widget in native view
To add it to native view we have to do little bit more work
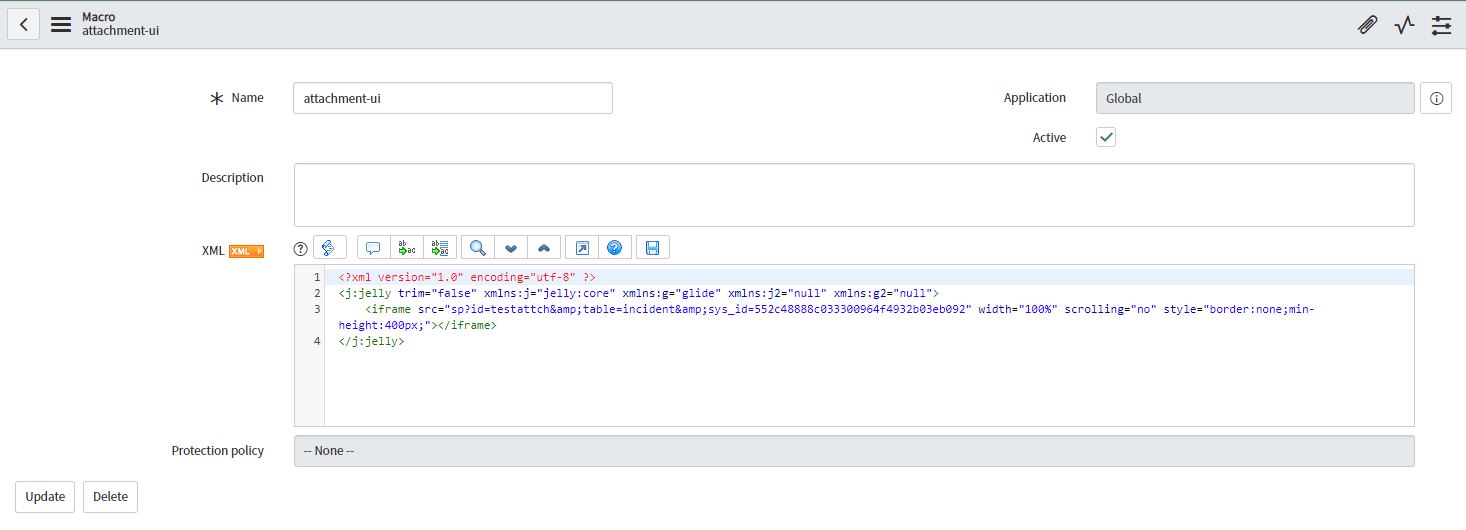
Create a macro with name attachment-ui and add the content below. Basically we are loading the ui page here in an iframe
<?xml version="1.0" encoding="utf-8" ?>
<j:jelly trim="false" xmlns:j="jelly:core" xmlns:g="glide" xmlns:j2="null" xmlns:g2="null">
<iframe src="sp?id=testattch&table=incident&sys_id=552c48888c033300964f4932b03eb092" width="100%" scrolling="no" style="border:none;min-height:400px;"></iframe>
</j:jelly>
replace the table name and the sysid as per your need. Note that this can also be made dynamic and load in the context of the record.Also note one more thing, & is not typo without this SNOW will not allow to save the content.
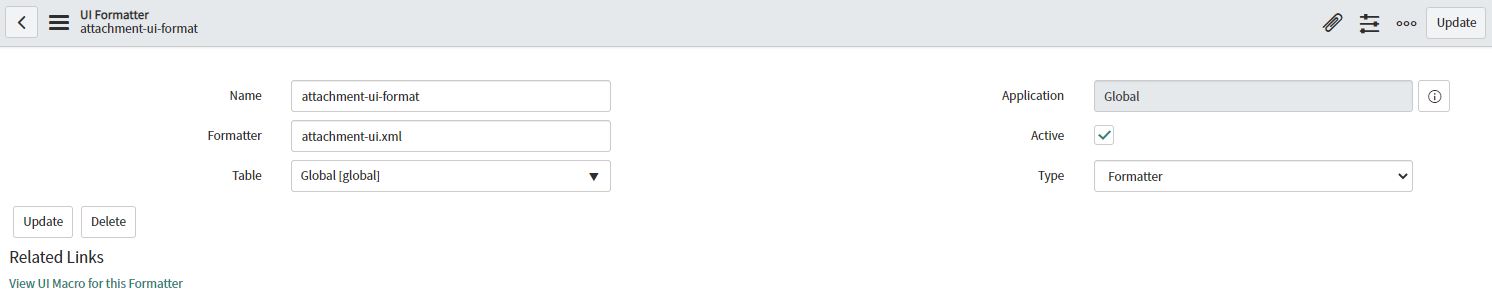
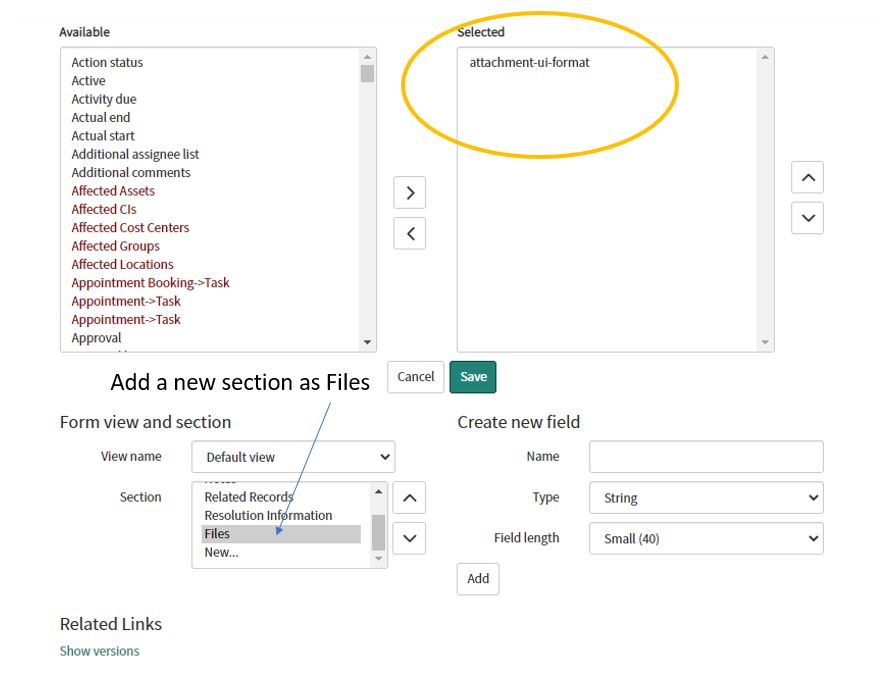
then create a UI formatter. In the formatter field put the <macro name>.xml . So in this case it will be attachment-ui.xml.
finally add this ui formatter inside table using configure layout.
- Understanding Request, RITM, Task in ServiceNow
- Steps to create a case in ServiceNow (CSM)
- Performance Analytics in 10 mins
- Event Management in 10 minutes - part1
- Event Management in 10 minutes - part2
- Custom Lookup List
- Script includes in 5 minutes
- Interactive Filter in 5 minutes
- UI Policy in 6 Minutes
- Client Side Script Versus Server Side Script in 3 minutes
-
Snow
- Performance Analytics
- ServiceNow Scripts
- Script include
- Useful scripts
- Basic Glide Scripts
- Client Script
- Advance Glide Script
- Glide System Script
- Admin
- Import Set
- Work Flow
- ACL
- SLA
- Notification
- Core Application
- UI Policy
- UI Action
- Client Script
- CAB Workbech
- Data Policy
- Connect Support
- Catalog
- Discovery
- CSM
- Event Management
- HR
- Integrations
- SSO Integration
- LDAP Integration
- SCCM Integration
- AWS Intergration
- Slack Integration
- CTI Integration
- Jira Integration
- Ebonding ServiceNow
- SOAP Integration
- IBM Netcool Integration
- VIP Mobile App Integration
- Rest Integration
- Service Portal
- Questions
- ACL
- Performance analytics(PA) Interactive Filter
- Various Configurations in Performance analytics(PA)
- Service Portal
- Performance Analytics(PA) Widgets
- Performance Analytics(PA) Indicator
- Performance Analytics(PA) Buckets
- Performance Analytics(PA) Automated Breakdown
- Client Script
- Rest Integration
- Understanding the Request, RITM, Task
- Service Catalogs
- Events in ServiceNow
- Advance glide script in ServiceNow
- CAB Workbench
Author
Chandrima
With 9+ years of ITSM development experience,Chandrima likes to deep dive ServiceNow modules.She have extensively worked on PA,Service Portal,Event management.
Comments