What is Agent Workspace?
A graphical user interface where agents can
• Find an issue,
• Research the issue to find a solution,
• Resolve the issue and
• Communicate the resolution to the requester.
Agent workspace supports two form views:
-
Workspace(common to CSM and ITSM)
-
CSM workspace(only to CSM)
Plugins:
-
Agent workspace(com.agent_workspace)
-
CSM Workspace(com.snc.agent_workspace.csm)
Roles:
- Workspace administrator( workspace_admin): This roles helps to configure agent workspace.
Workspace administrator role contains below roles:
i)Form_admin
ii)Chat_admin
iii)Template_editor
iv)Ui_action_admin
v)Personalize_form
vi)Interaction_admin
vii)Workspace_list_admin
-
Workspace list administrator(workspace_list_admin): This role provides the ability to create list categories and filtered lists in Agent Workspace. This role contains workspace_user
-
Workspace agent(agent_workspace_user): This role provides the ability to access to agent workspace. ITIL(ITSM) and sn_esm_agent(CSM) roles contain this role.
-
Workspace user( workspace_user): This role provides the ability to access to workspace_core. This role is for internal use only.
Agent Workspace components
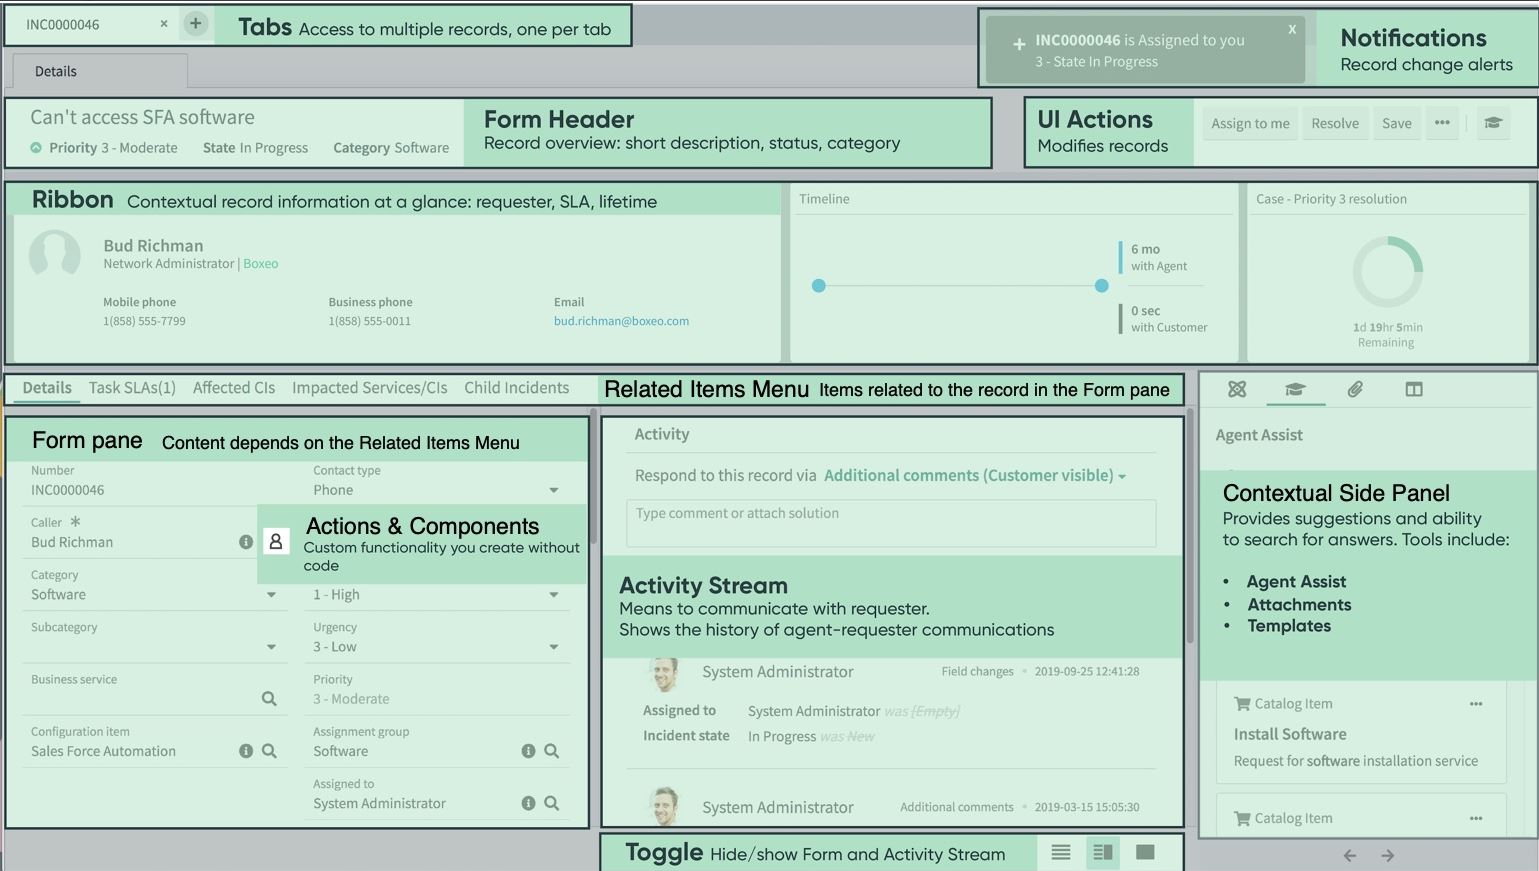
Importent components:


Below Items we have to setup to configure agent workspace:
• Forms
• Ui actions
• Client scripts
• UI policies
• Form Header
• Ribbon
• Workspace settings
• Additions items need to configure
     1.Agent Assist
     2.Global search
     3.Chat
     4.CTI
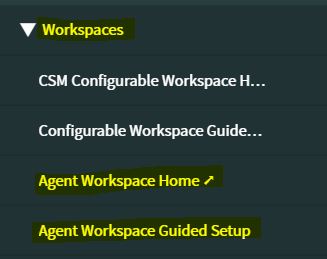
Agent workspace-Guided Setup:
This is step by step guide to create all the necessary configuration items to get workspace up and running.
Agent workspace Setup:
- Configure a list View
- Configure a Record Menu Item
- Configuration Ribbon Settings
- Configure Form Header
Step 1: Add the Roles:
-Add workspace_admin and Workspace_list_admin roles.
-Logout and login again as system administrator.
Step 2: Navigate to your User Menu in the upper right corner and selected Elevate Roles
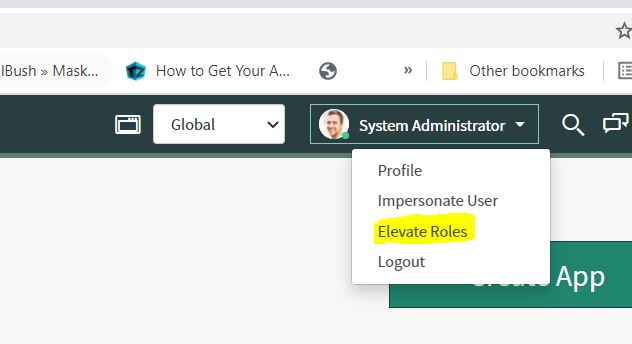
Step 3: Check the workspace_list_admin role and click OK
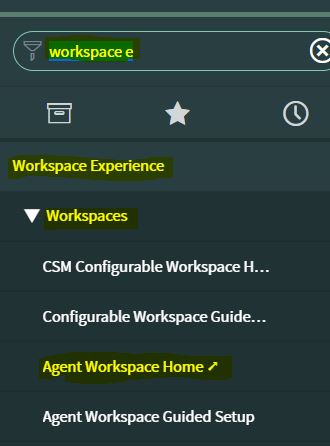
Step 4: Navigate to Workspace Experience>workspace>Agent workspace
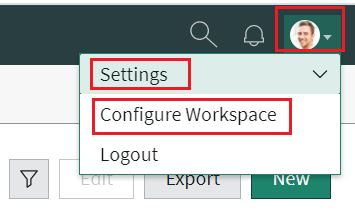
Step 5: In your workspace , click on profile image >Settings>Configure Workspace
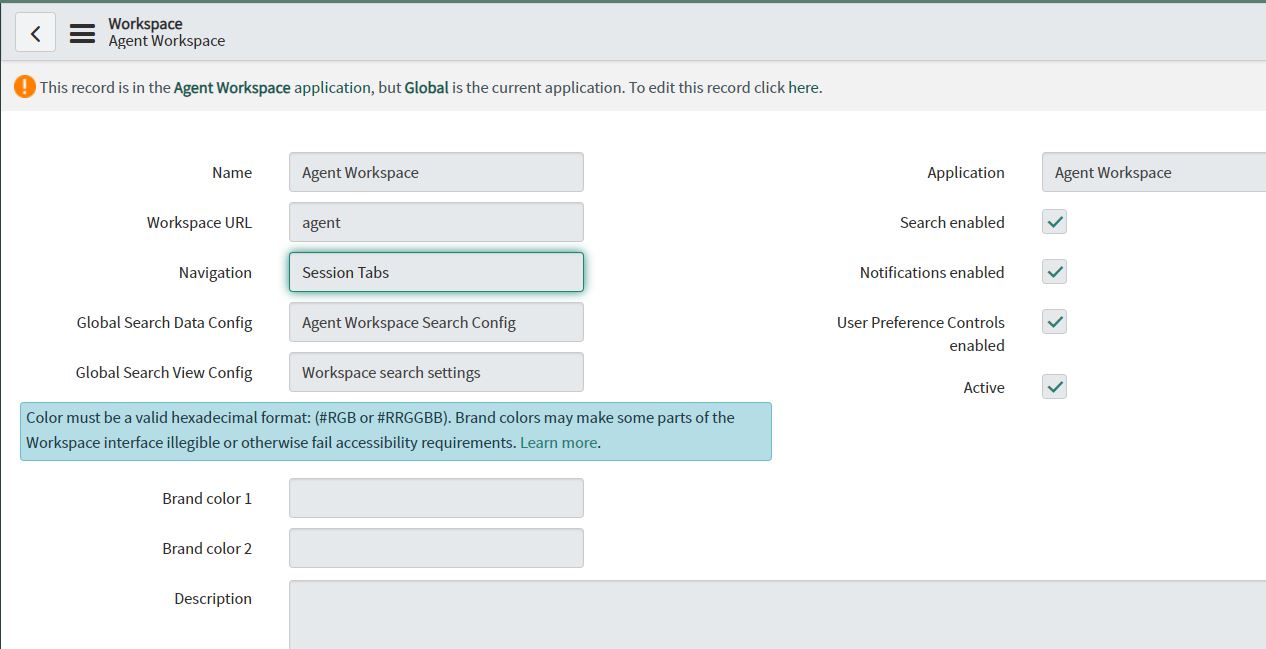
Step 6: Separate browser tab will open with Agent Workspace configuration record.
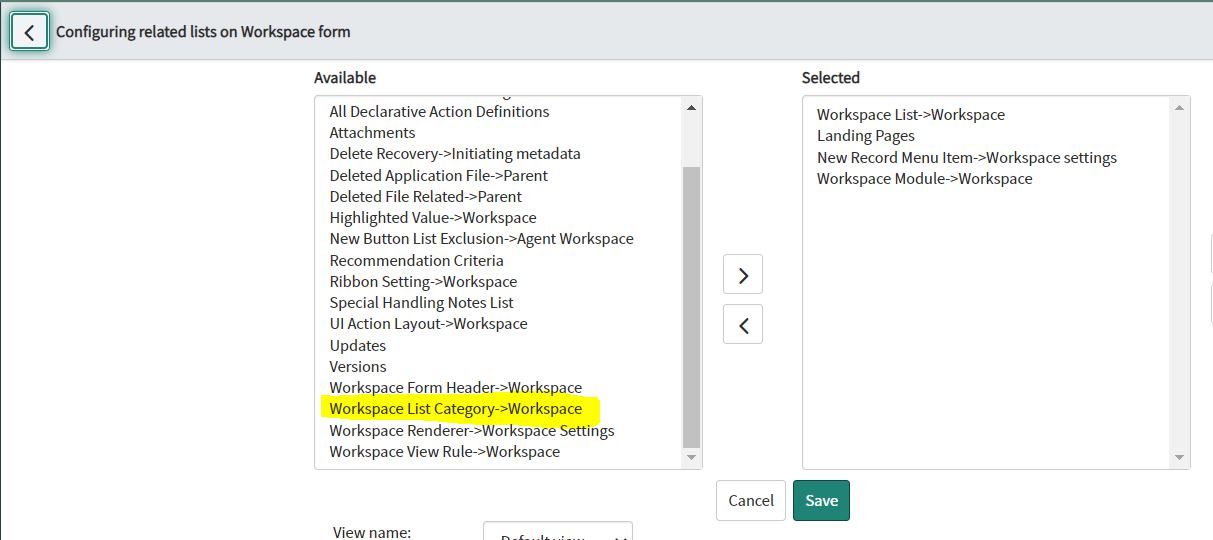
Step 7: Open the Form Context menu and click on configure> Related Lists.
Step 8: Add the Workspace List Category > Workspace list to the Slushbucket and click on save button.
Step 9: Select the Agent Workspace scope from the Application Picker.
Step 10: Scroll down to the Workspace List Categories related list.

Step 11: Click on New

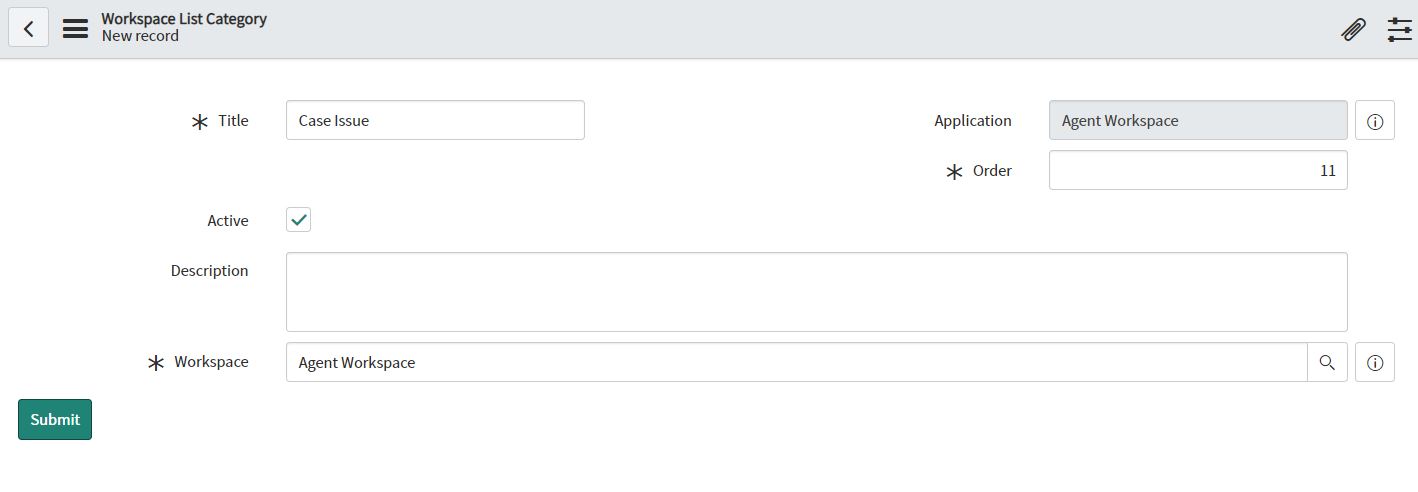
Step 12: Fill the details as below and click on Submit button.
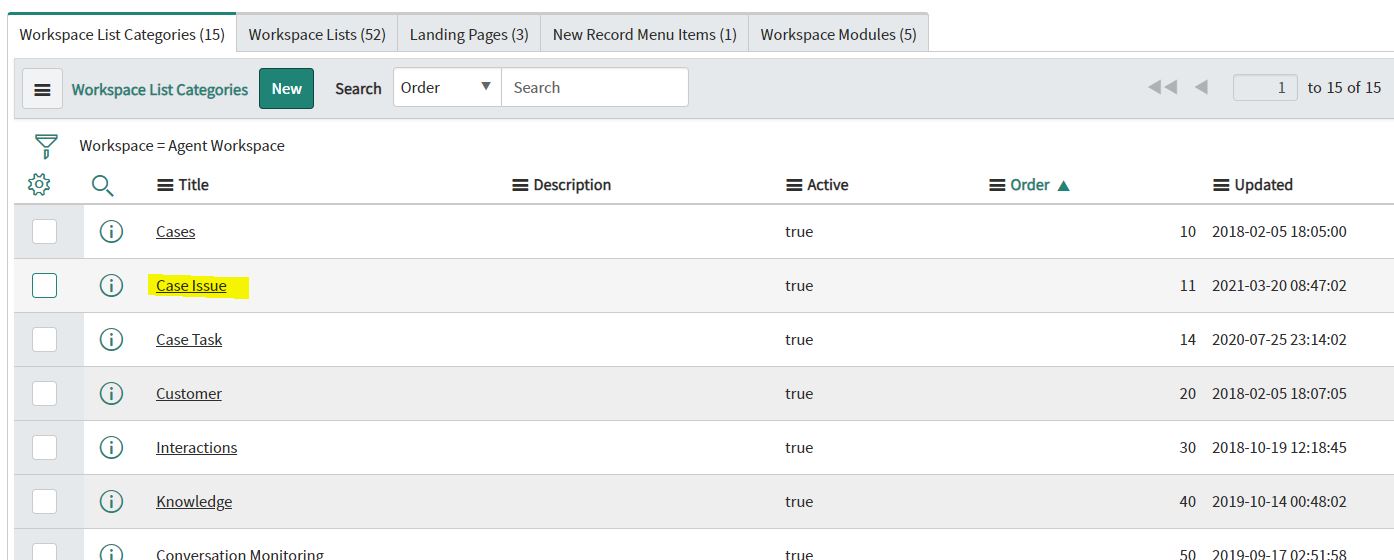
Step 11: We can see our category
Step 12: Scroll down to the Workspace List related list.

Step 13: Click on New

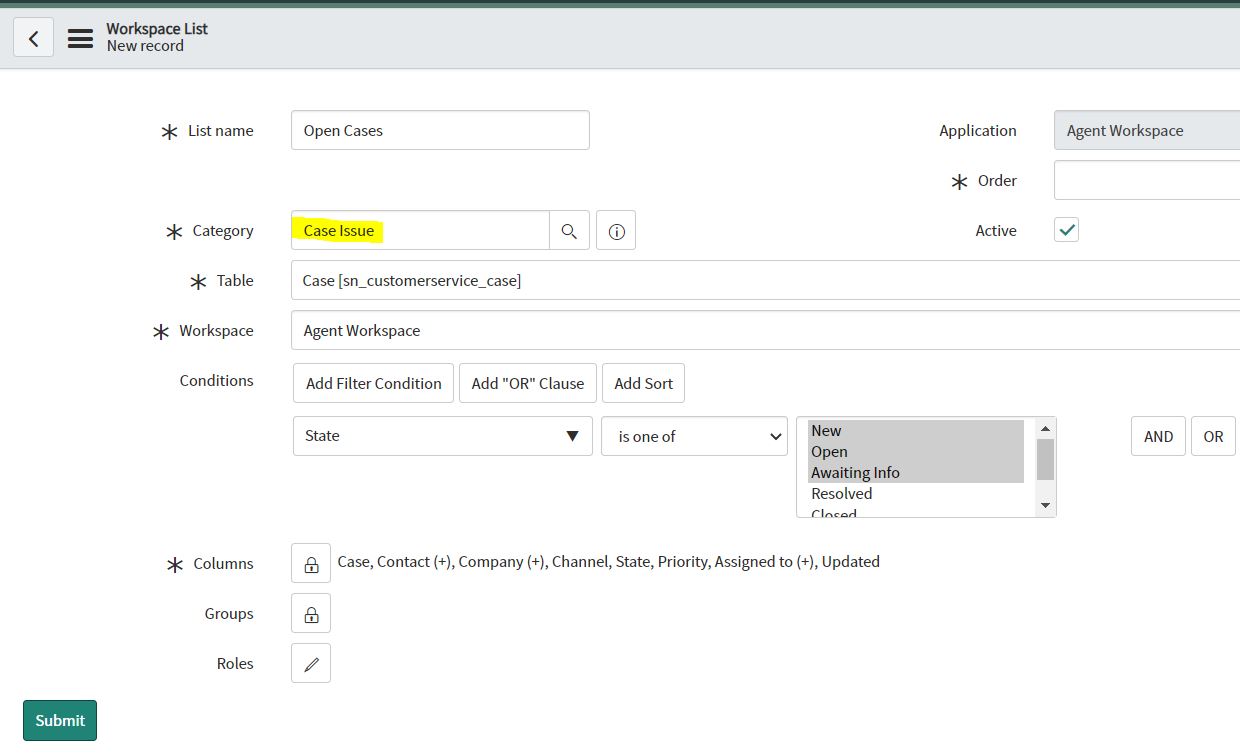
Step 14: Complete the form as follows and click on Submit button
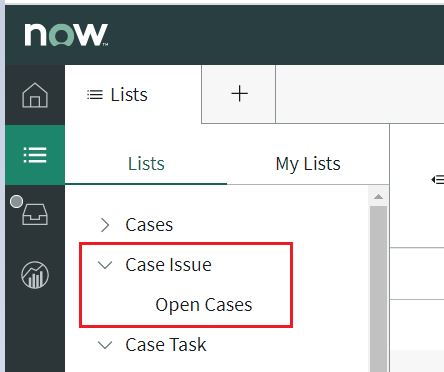
Step 15: We can see our List category and list in the agent workspace
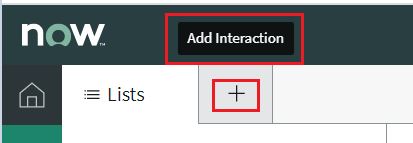
Configure Record Menu
Using the Record Menu agent can create a new record in Agent workspace interface. The current configuration only allows them to create an interaction.
Step 1: Scroll down to the New Record Menu Items related list

Step 2: Click on New

Step 3: Complete the form as follows and click on Submit button
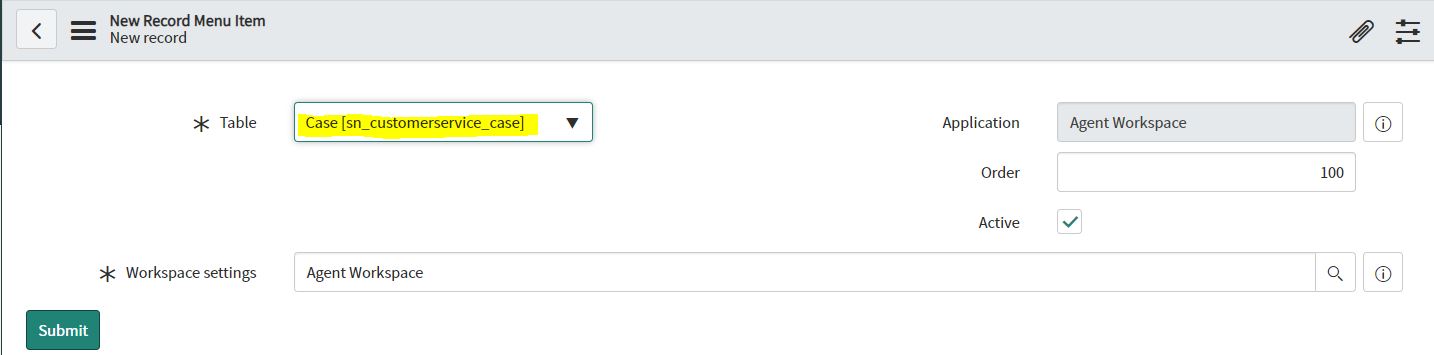
Step 4:
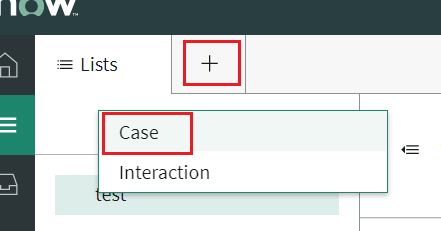
Now in the agent workspace interface we can see Case option to create new record in case table
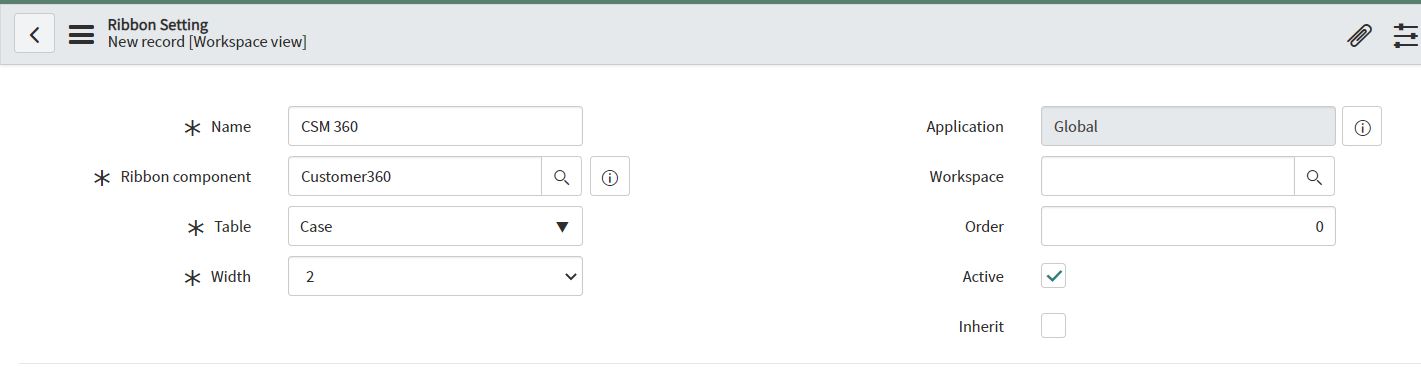
Configure Ribbon Settings:
Ribbons contain information about the record, such as timeline, the user or customer summary, and SLAs.
Ribbon helps agents to get record details.
Ribbons describe contextual information about the record displayed in the form.
Each ribbon can have multiple components and each component can occupy a configured amount of screen space.
Only one ribbon can be associated with a table.
Whenever an agent selects a record from a table associated with a ribbon, the ribbon appears.
If the agent then selects a record from a table to associate with a ribbon, then ribbon disappears.
Types of Ribbon Component:
-
Active SLA: The Active SLA ribbon displays an indicator of active SLAs, including time remaining, SLA state, and SLA breaches.
-
CMDB Health: CMDB Health ribbon displays critical incidents, change requests, and health scores (incomplete attributes, non-compliant relationships, stale relationships) of a configuration item.
-
CMDB Relationship: CMDB Relationships ribbon displays level 1 relationships of a configuration item.
-
CMDB Timeline: The CMDB Timeline displays record changes, change requests, and incidents on the timeline for a configuration item. By default, the timeline shows the past 14 days.
-
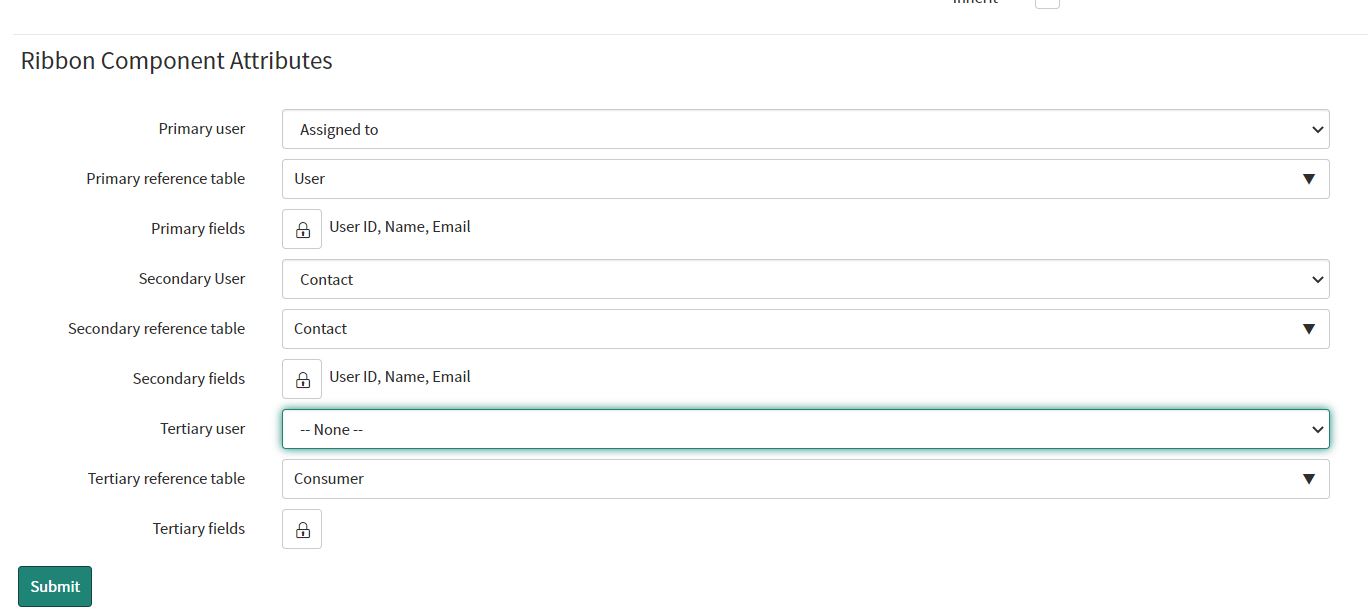
Customer360: Using this component we can display customer information.
-
Timeline: The Timeline ribbon displays a summary of record activities, including state changes and interactions between the agent and the customer. It also shows how much time the agent and customer, or requester spent on the record. The timeline ribbon component uses the resolution shaper configuration for the selected entity table.
Ribbon Configuration:
Step 1: Navigate to Workspace Experience >Forms>Ribbon Settings
Step 2: Click on New Button

Step 3: Complete the form as follows and click on Submit button
Header Configuration
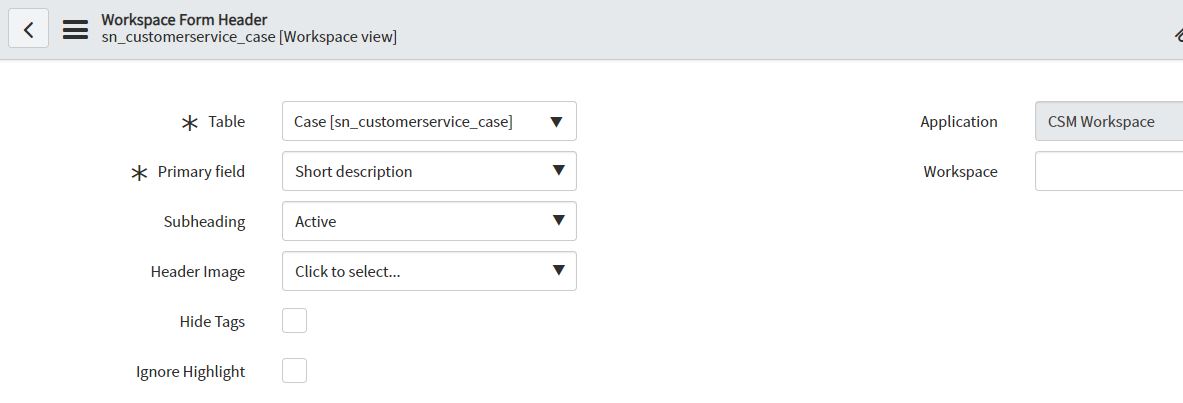
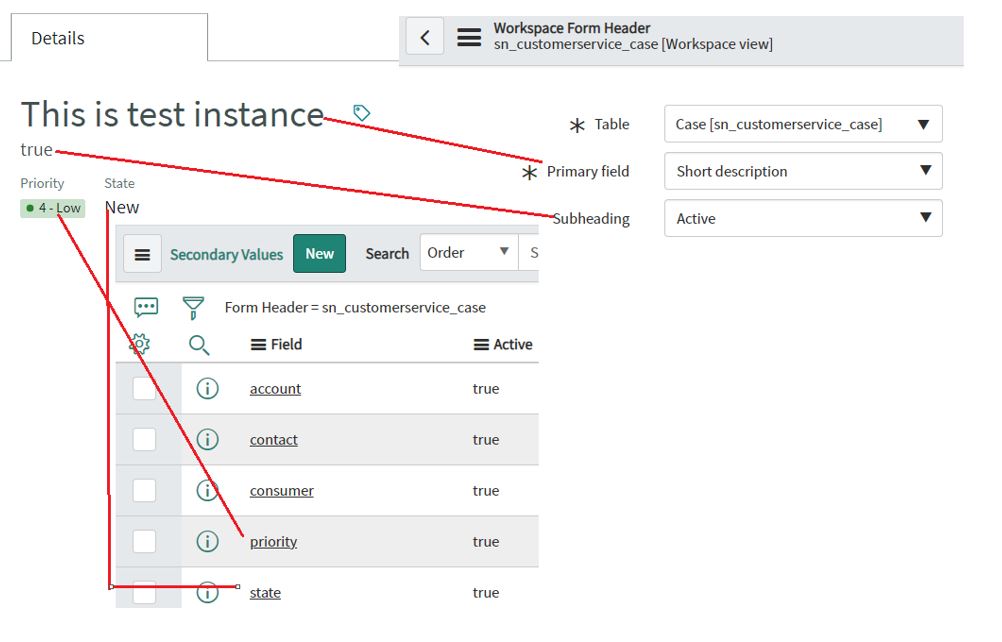
Configure the form header and sub headers in Agent Workspace so that agents can quickly see information about each record.
Form headers are made up of one primary header and several secondary headers, or subheaders.
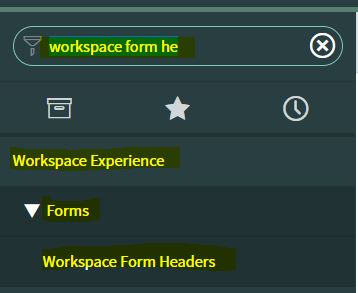
Step 1: Navigate to Agent Workspace > Forms > Form Headers.
Step 2: Click New.

Step 3: Select a table from the list. Note: Configuration tables are not included as an option for form headers in Agent Workspace.
Step 4: From the Primary field list, select the field that you want as the form header. Choose a field that is descriptive and unique. For example, you could choose short_description.
Step 5: Right-click the form header and select Save.
Step 6: To add secondary fields to the form subheader, select the fields that add important details to the form, such as priority, state, and category.
Note: You can select as many secondary fields for the header as you want; however, only the first five non-empty fields show in the header.
Step 7: Click Submit.
Note: Forms can inherit the header configuration from the parent tables. For example, if the Incident [incident] table does not have a table configuration, any incident records inherit the configuration from the Task [task] table.
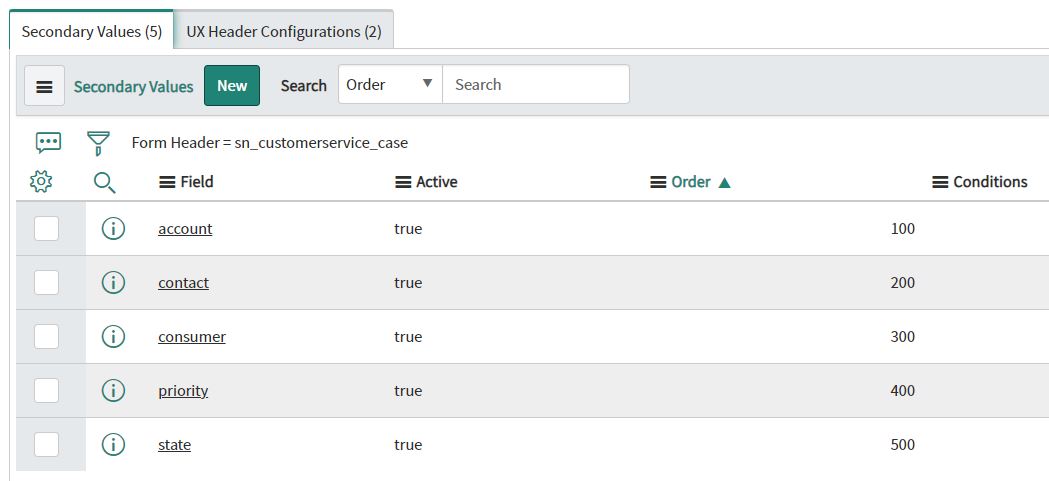
Now we can see the Header and sub header and secondary field as below
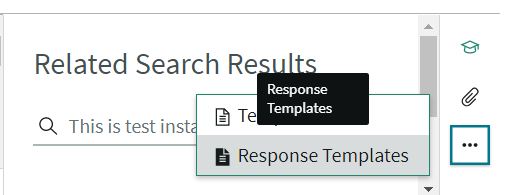
Response template
Customer service agents can copy content from response templates and add it to cases and case tasks.
Step 1: In CSM Agent Workspace, open a customer service case or case task.
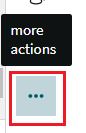
Step 2: Click on more action … on the Contextual Side panel
 Step 3: Click on Response templates
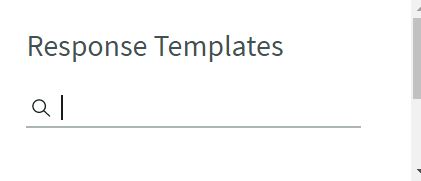
Step 4: In the Response Templates side panel, search for a template.
Step 5: Select a response template

Step 6: Click on Copy to clipboard.

Step 7: Paste the template text into the Work notes field or the Additional comments field.
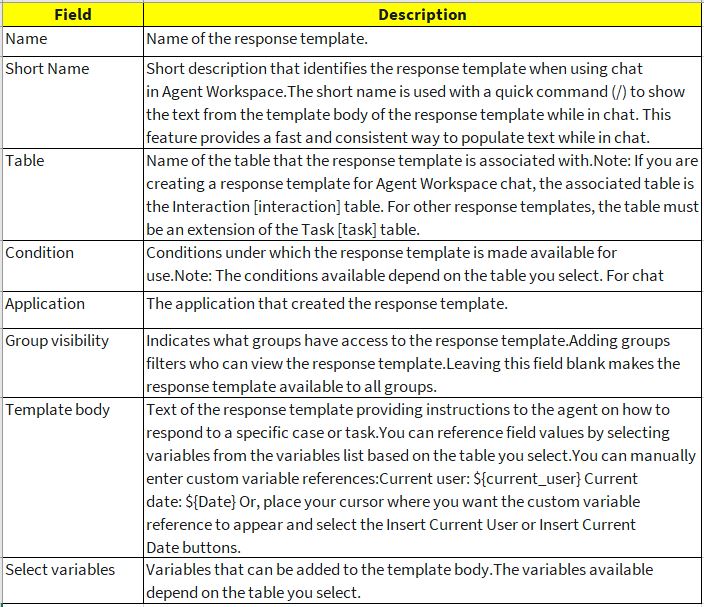
Create or modify a response template
Step 1: Navigate to System Definition > Response template configuration.
Step 2: Click New or open a record.
Step 3: Fill in the fields on the form.
Templates
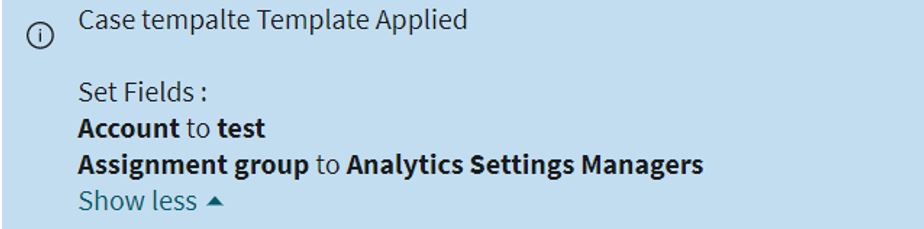
Reduce an agent’s time responding to requesters by automatically filling in record fields Agent use a template to auto fill in record fields. You associate templates with tables. Whenever an agent works on a record from that table, the agent can click a template to fill fields in the form.
For example, you might create a High Priority template for the problem table. Whenever agents work on a problem, if they click the template, it sets the Urgency field in the problem record to High.
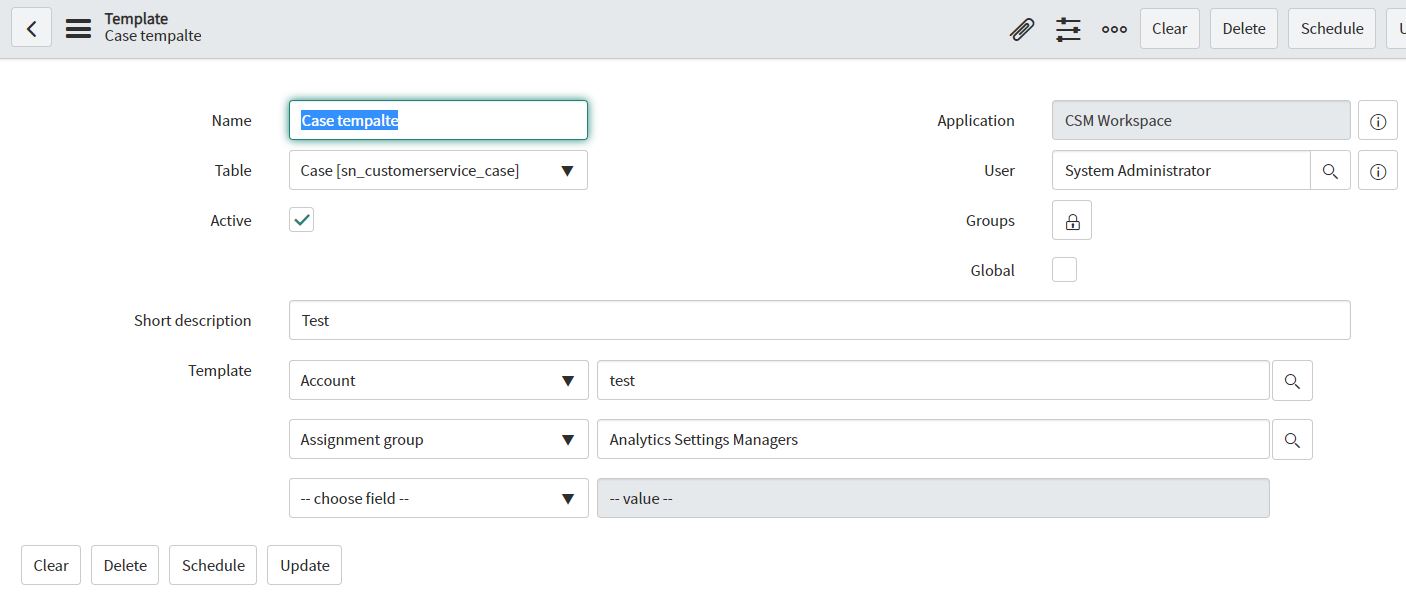
Create or modify a template
Step 1: Navigate to System Definition > Templates.
Step 2: Click New.
Step 3: On the form, fill in the fields

Use Template
Step 1: In CSM Agent Workspace, open a customer service case or case task.
Step 2: Click on more action … on the Contextual Side panel
Step 3: Click on Templates
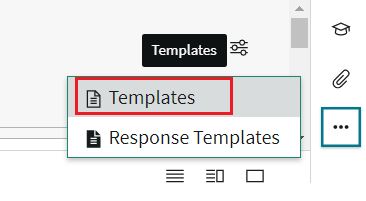
Step 4: In the Templates side panel, search for a template and Select a template
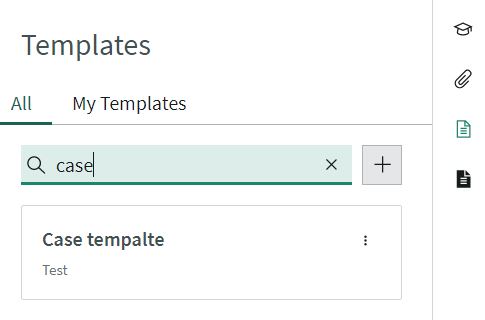
Step 5: Click on template to copy the field
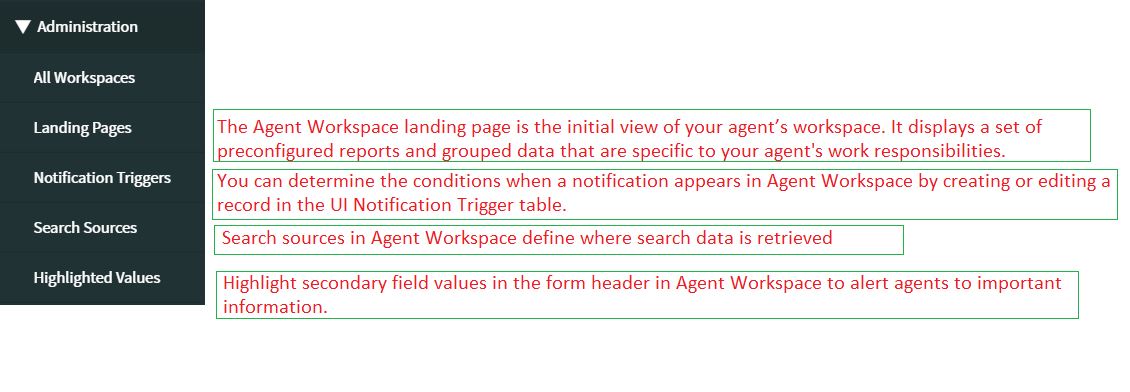
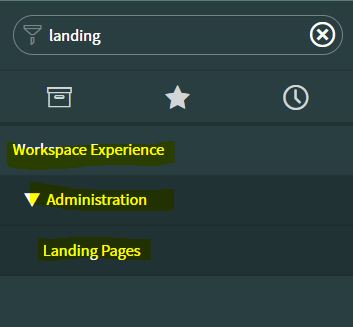
Landing Page
The landing page is the first thing agents will see in Agent Workspace. It displays a set of preconfigured reports and PA widgets that are specific to the agent’s work responsibilities.
Steps 1: Navigate to Agent Workspace > Landing Pages.
Steps:

Follow the link to create Landing page Landing Page
Search sources
Search sources in Agent Workspace define where search data is retrieved from.
Step 1: Navigate to Agent Workspace > Search Sources.
Step 2: Click New or open an existing search source to edit.
Step 3: Complete the following fields as needed.

Step 4: Click Save or Update.
- Understanding Request, RITM, Task in ServiceNow
- Steps to create a case in ServiceNow (CSM)
- Performance Analytics in 10 mins
- Event Management in 10 minutes - part1
- Event Management in 10 minutes - part2
- Custom Lookup List
- Script includes in 5 minutes
- Interactive Filter in 5 minutes
- UI Policy in 6 Minutes
- Client Side Script Versus Server Side Script in 3 minutes
-
Snow
- Performance Analytics
- ServiceNow Scripts
- Script include
- Useful scripts
- Basic Glide Scripts
- Client Script
- Advance Glide Script
- Glide System Script
- Admin
- Import Set
- Work Flow
- ACL
- SLA
- Notification
- Core Application
- UI Policy
- UI Action
- Client Script
- CAB Workbech
- Data Policy
- Connect Support
- Catalog
- Discovery
- CSM
- Event Management
- HR
- Integrations
- SSO Integration
- LDAP Integration
- SCCM Integration
- AWS Intergration
- Slack Integration
- CTI Integration
- Jira Integration
- Ebonding ServiceNow
- SOAP Integration
- IBM Netcool Integration
- VIP Mobile App Integration
- Rest Integration
- Service Portal
- Questions
- ACL
- Performance analytics(PA) Interactive Filter
- Various Configurations in Performance analytics(PA)
- Service Portal
- Performance Analytics(PA) Widgets
- Performance Analytics(PA) Indicator
- Performance Analytics(PA) Buckets
- Performance Analytics(PA) Automated Breakdown
- Client Script
- Rest Integration
- Understanding the Request, RITM, Task
- Service Catalogs
- Events in ServiceNow
- Advance glide script in ServiceNow
- CAB Workbench
Author
Chandrima
With 9+ years of ITSM development experience,Chandrima likes to deep dive ServiceNow modules.She have extensively worked on PA,Service Portal,Event management.
Comments