Introduction
Widgets are a very powerful component in Service Portal.In Service Portal we can created our own widgets.Process data and display any data in the widgets based on our needs.This gives us with infinite choices to design our dashboards.
Creating a new Widget
We can create widget in 2 ways.
- By typing widget in the left navigation pane and click new.
- By typing service portal in the left navigation pane and click
Service portal configuration.
2nd method is preferred
2nd method
.png)
Then click widget editor
.png)
.png)
In widget editor we can see below
.png)
Panes
1. HTML template
2. Client Script/client controller
3. Server Script
4. CSS
5. Preview
Tick preview to see the html changes
.png)
Also check public widget to make this widget publicly available
The Angular Basics
Service Portal uses angular directive to construct decision logic using controller and html views.We should have a basic understanding for the various directive available.
Angular Directive

1. Ng-click
2. Ng-if
3. Ng-repeat
4. Ng- model
5. Ng-bind
Ngclick
Ngclick is a directive in angular to define functionality on a button or link etc.
In the html Code
<element ng-click="expression"></element>Here we mention the function name which we want to call inside the ng-click directive
.png)
 <div>
  <button ng-click="hello()">
    Click
  </button>
</div>
Write client script
.png)
function($scope) {
  /* widget controller */
  var c = this;

	//function
	$scope.hello = function(){
		alert("Hello World");
	}
}
The $scope is the binding part between the HTML (view) and the JavaScript (controller).$scope is an object in Angular that holds all functions and properties.This properties/method can be accessed in the html page. As we have done here for method hello () in html ng-click directive.
hello() is a function. We defined the function in the client script and used it in the html template.
#Below two points are key

We must define all function and variables inside $scope only.
We must define $scope parameter in the root function
Note: Hit the save button (at the top) to see the code changes reflected in the preview.
We can also hit cntrl+s to save the widget.
Now check preview pane and click the button to see the alert
.png)
Ng-if
To apply any conditional logic to the html page based on true/false we need to use Ng-if.
The condition within the “” of ng-if should evaluate to true/false
Example 1
Write a code in html
<element ng-if="expression"></element>.png)
<div>
  <span ng-if="show">
    Hello
  </span>
</div>
Write client script
.png)
function($scope) {
  /* widget controller */
  var c = this;
	$scope.show = true;
}
So, the hello message will show in the html
.png)
Example 2
Using a condition we can also use a condition like if say number of coins are greater than 0 then show otherwise don’t.
In html we write below code, the condition is if number of coins is zero or undefined we show No coins.If number of coins is greater than 0 we show the number of coins.
In the html Code
.png)
Notice that we have {} to express a scope variable defined in the Client Script
<div>
  <span ng-if="coins ==0 || coins == undefined">No coins </span>
  <span ng-if="coins>0"> coin(s) </span>
</div>
In client script
.png)
function($scope) {
  /* widget controller */
  var c = this;

	//variable
	$scope.coins = 1;
}
In preview we see
.png)
Example 3
We can do the same thing using sever side variable.
For server-side variable we have always represent as data.variable in Client/HTML code
In the html Code
.png)
<div>
  <span ng-if="data.coins ==0 || data.coins == undefined">No coins </span>
  <span ng-if="data.coins>0"> coin(s) </span>
</div>
In server script
.png)
(function() {

	data.coins =1;

})();
In preview we see
.png)
Ng repeat
If we have a list of items and we want to iterate in a loop then we can use Ng repeat.
Example 1
In Server script
.png)
(function() {

	data.coinType = [];
	data.coinType.push("gold");
	data.coinType.push("silver");

})();
In html
use ng repeat
.png)
<div>
  <span ng-repeat= "coin in data.coinType">
   {{coin}}
    <br>
  </span>
</div>
Where coin is the temporarily variable pointing to current object in the loop
Example 2
We can do the same thing using a variable in client controller. Only difference is we have to use the scope variable instead of data.
In html
.png)
<div>
  <span ng-repeat= "coin in coinType">
    {{coin}}
    <br>
  </span>
</div>
In client Script
.png)
function($scope) {
  /* widget controller */
  var c = this;

	$scope.coinType = [];
	$scope.coinType.push("gold");
	$scope.coinType.push("silver");
}
In preview
.png)
Ng bind
If we want to attach a variable from the client script to the html page we have to use ng bind.
Ng bind is uni-directional from client script to the html page.
In html
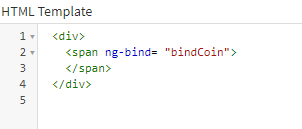
<div>
 <span ng-bind="bindCoin"></span>
</div>
In client Script
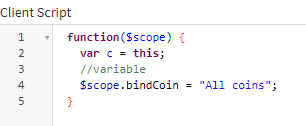
function($scope) {
  /* widget controller */
  var c = this;
	$scope.bindCoin = "All coins";
}
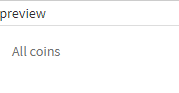
In preview
Lets have a look at the unidirectional behaviour
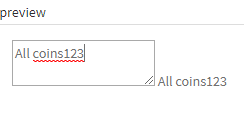
we will use a textarea and bind the value, but because we use bind when we make some changes in the textarea the client script variable will not update because bind is uni directional.
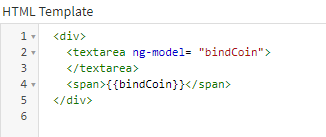
In html
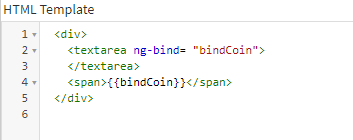
<div>
 <textarea ng-bind="bindCoin"></textarea>
  <span>{{bindCoin}}</span>
</div>
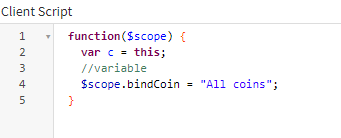
In client Script
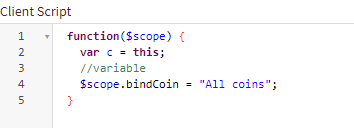
function($scope) {
  /* widget controller */
  var c = this;
	$scope.bindCoin = "All coins";
}
In preview
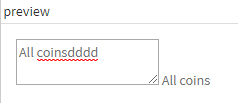
Even if we change in the text area, the underyling will not get updated
But instead if we use ng-model with the same example,then we will see it will update the underlying variable.We will ng-model in the next section.
Ng Model
Binds both ways so from html we can update back the variable. This can be used when we submit a form (with latest changes)
In html
<div>
 <textarea ng-model="bindCoin"></textarea>
  <span>{{bindCoin}}</span>
</div>
In client Script
function($scope) {
  /* widget controller */
  var c = this;
	$scope.bindCoin = "All coins";
}
SP Util
Sputil is a inbuild library available that we can use client script.Have lot of ootb function that we can use. Utility methods to perform common functions in a Service Portal widget client script.
Few of the most common functions are
- update
- recordWatch
- addErrorMessage/addInfoMessage
Data flow in widget
widget starts from the server script where the data objects gets populated, then it reaches client where it gets updated by form based user action like save, then in client side the updated data is copied into input object and passed back to the server.
To get the new updated data from the html/client script we need to use the input object in server side.
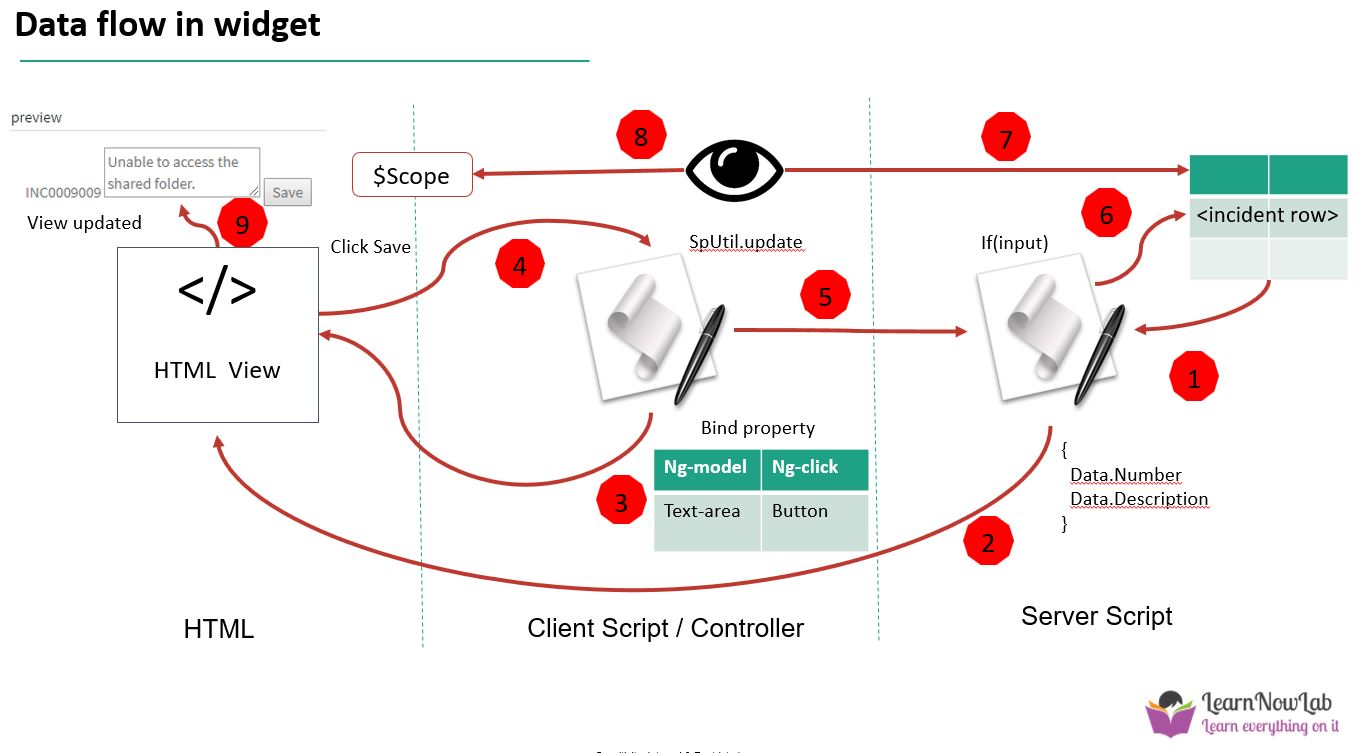
A typical server to client and back to server have the following flow
- Current record is loaded in to data object (say a particular incident details)
- The
datais then send to client/HTML page for view - Along with that
ng-modelandng-clickbinding occurs for displaying,updating and saving the form state. - User clicks
saveafter updating the description and theevent is fired. - Client script calls the
SpUtil updateto call the server side and request to update the data - The server sides observes there is
inputobject so it understands data has been updated from client side.It saves the updated data to the table
One thing to note here though after save the actual table data gets updated,the widget data object is still holding the old data,so in the text area it will show the old data only
So how do we see updated data?
- Ofcourse we can just refresh the page which will force a backend fetch abd it will update the widget data object
- A better solution is to set a
watcherthat canpullinformation from the server table and update the view
Lets check this with an example.
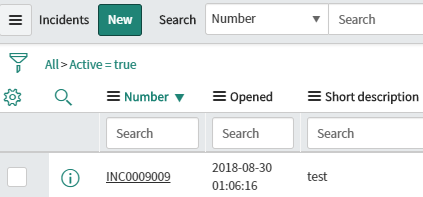
In this example we will load an incident name and short description from sever to client using the data object.
In Server script
(function() {

    var incRec = new GlideRecord('incident');
    incRec.addQuery('number', 'INC0009009');
    incRec.query();
    if (incRec.next()) {
        data.number = incRec.number.toString();
        data.short_description = incRec.short_description.toString();
    }
})();
In html
<div>
  {{data.number}}
 <textarea ng-model="data.short_description"></textarea>
  <button ng-click="save()">Save</button>
</div>

Now lets write logic to save the data in the backend using the server.update method.
In client Script
function($scope, spUtil) {
    /* widget controller */
    var c = this;

    $scope.save = function() {
        spUtil.update($scope)
    }
}
Here use the spUtil update method to update in the backend using the input object. So we update our server script as below.
Note that here we update the incident table description from the input object which is passed from the client.
In Server script
(function() {

    var incRec = new GlideRecord('incident');
    incRec.addQuery('number', 'INC0009009');
    incRec.query();
    if (incRec.next()) {
        data.number = incRec.number.toString();
        data.short_description = incRec.short_description.toString();
    }

    if (input) {

        var incRec1 = new GlideRecord('incident');
        incRec1.addQuery('number', 'INC0009009');
        incRec1.query();
        if (incRec1.next()) {
            incRec1.short_description = input.short_description;

            incRec1.update();
        }
    }

})();
Now lets update the description in the client html page and see it in the incident table
Before save the description
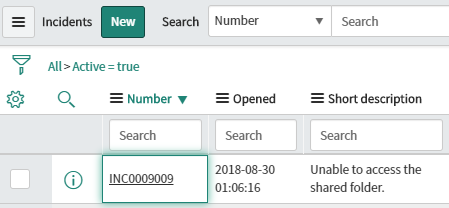
After save the description changed
Notice that the view is till showing the old data.
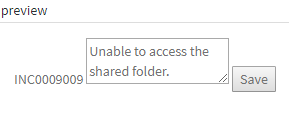
To see the new data we can refresh the preview or we can use Record watcher, which can dynamically update the data.
In RecordWatch util method we have mention the table name which we want to watch for updates,also we can add any filter, i.e example below we add the ticket number
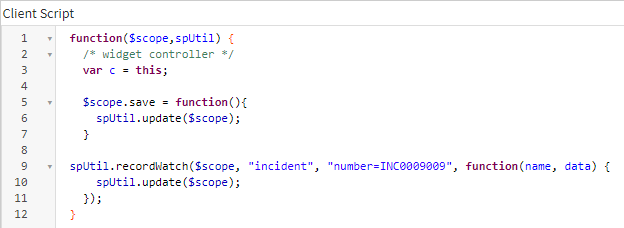
In client Script
    spUtil.recordWatch($scope, "incident", "number=INC0009009",
        function(name, data) {
            spUtil.update($scope)
        });
The Full code
In Server script
(function() {

    var incRec = new GlideRecord('incident');
    incRec.addQuery('number', 'INC0009009');
    incRec.query();
    if (incRec.next()) {
        data.number = incRec.number.toString();
        data.short_description = incRec.short_description.toString();
    }

    if (input) {

        var incRec1 = new GlideRecord('incident');
        incRec1.addQuery('number', 'INC0009009');
        incRec1.query();
        if (incRec1.next()) {
            incRec1.short_description = input.short_description;
			incRec1.update();
        }
    }

})();
In client Script
function($scope, spUtil) {
    /* widget controller */
    var c = this;

    $scope.save = function() {
        spUtil.update($scope)
    }


    spUtil.recordWatch($scope, "incident", "number=INC0009009",
        function(name, data) {
            spUtil.update($scope)
        });
}
In html
<div>
  {{data.number}}
 <textarea ng-model="data.short_description"></textarea>
  <button ng-click="save()">Save</button>
</div>
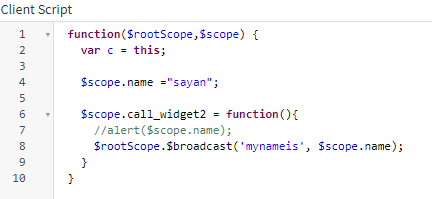
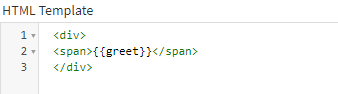
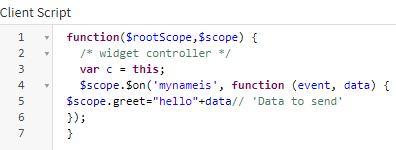
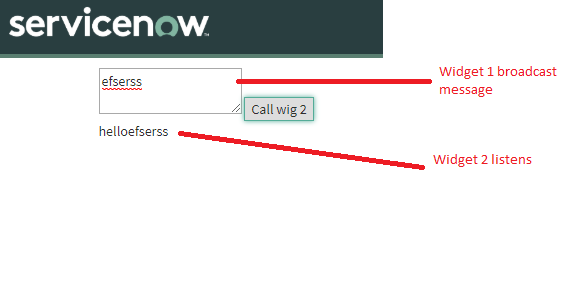
Intercommunication between widgets in Service Portal
A Service Portal page can have multiple widgets.To modularize our code we should have multiple widgets and establish communication between them.Below is an simple example to create 2 widgets and communicate between them
Widget 1

Widget 2
Read More
- Understanding Request, RITM, Task in ServiceNow
- Steps to create a case in ServiceNow (CSM)
- Performance Analytics in 10 mins
- Event Management in 10 minutes - part1
- Event Management in 10 minutes - part2
- Custom Lookup List
- Script includes in 5 minutes
- Interactive Filter in 5 minutes
- UI Policy in 6 Minutes
- Client Side Script Versus Server Side Script in 3 minutes
-
Snow
- Performance Analytics
- ServiceNow Scripts
- Script include
- Useful scripts
- Basic Glide Scripts
- Client Script
- Advance Glide Script
- Glide System Script
- Admin
- Import Set
- Work Flow
- ACL
- SLA
- Notification
- Core Application
- UI Policy
- UI Action
- Client Script
- CAB Workbech
- Data Policy
- Connect Support
- Catalog
- Discovery
- CSM
- Event Management
- HR
- Integrations
- SSO Integration
- LDAP Integration
- SCCM Integration
- AWS Intergration
- Slack Integration
- CTI Integration
- Jira Integration
- Ebonding ServiceNow
- SOAP Integration
- IBM Netcool Integration
- VIP Mobile App Integration
- Rest Integration
- Service Portal
- Questions
- ACL
- Performance analytics(PA) Interactive Filter
- Various Configurations in Performance analytics(PA)
- Service Portal
- Performance Analytics(PA) Widgets
- Performance Analytics(PA) Indicator
- Performance Analytics(PA) Buckets
- Performance Analytics(PA) Automated Breakdown
- Client Script
- Rest Integration
- Understanding the Request, RITM, Task
- Service Catalogs
- Events in ServiceNow
- Advance glide script in ServiceNow
- CAB Workbench
Author
Chandrima
With 9+ years of ITSM development experience,Chandrima likes to deep dive ServiceNow modules.She have extensively worked on PA,Service Portal,Event management.
Comments