Purpose
The purpose of this document is to evaluate a poc that involves ServiceNow UX page with ACL restriction enabled.
Use Case
We will first create an app using Snow studio then create page, element, component, script to create a helloworld webapp. Finally, we will apply control over the page using ACL.
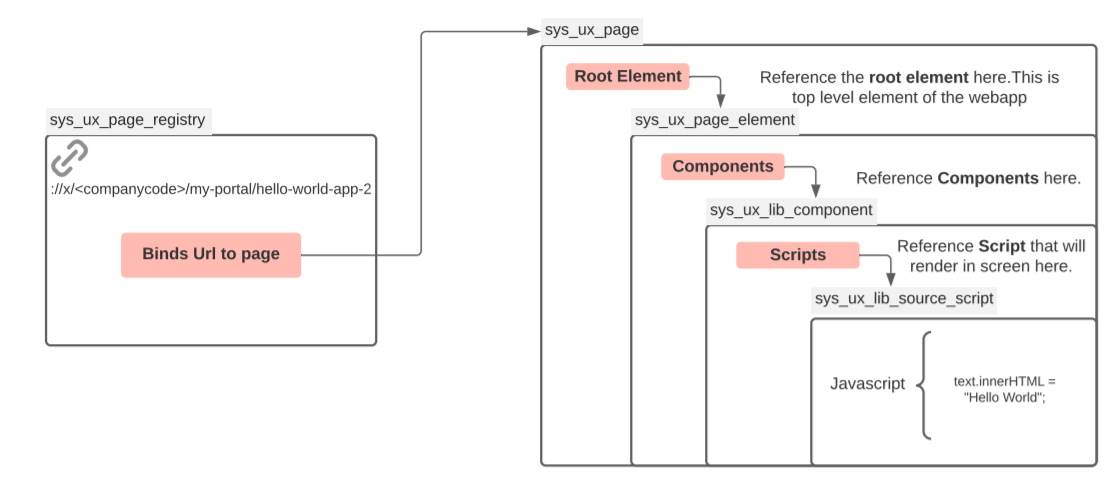
ServiceNow UI Framework:
ServiceNow UI framework is one of the latest module in ServiceNow which helps to create web application from scratch.
There are various components that are tied together to create a custom webapp. Below are tables that should be populated with records to make the webapp accessible from url.
Enable ACLs
Because this are core snow component, they by default private. We need to override this behavior by adding read/write acls on the following tables
• sys_ux_page_registry
• sys_ux_page
• sys_ux_page_element
• sys_ux_lib_source_script
• sys_ux_lib_component
Steps
There are 5 steps to take in order to construct a stand-alone web application in ServiceNow. To make things simple, let’s assume that our web app is a single web component which prints “Hello world” on a screen.
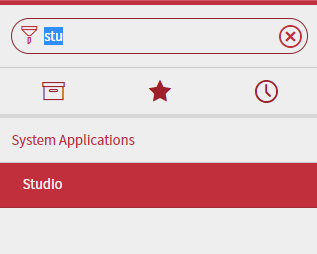
Step #1. Create a new application scope
a. In the left navigation pane under System Applications we will find the Studio
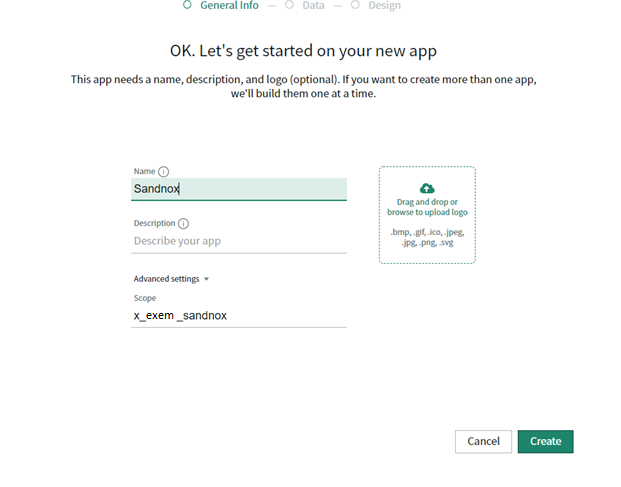
b. Click on Create Application button to create new Application

c. Fill the name of the application and scope. Then click on create Button.
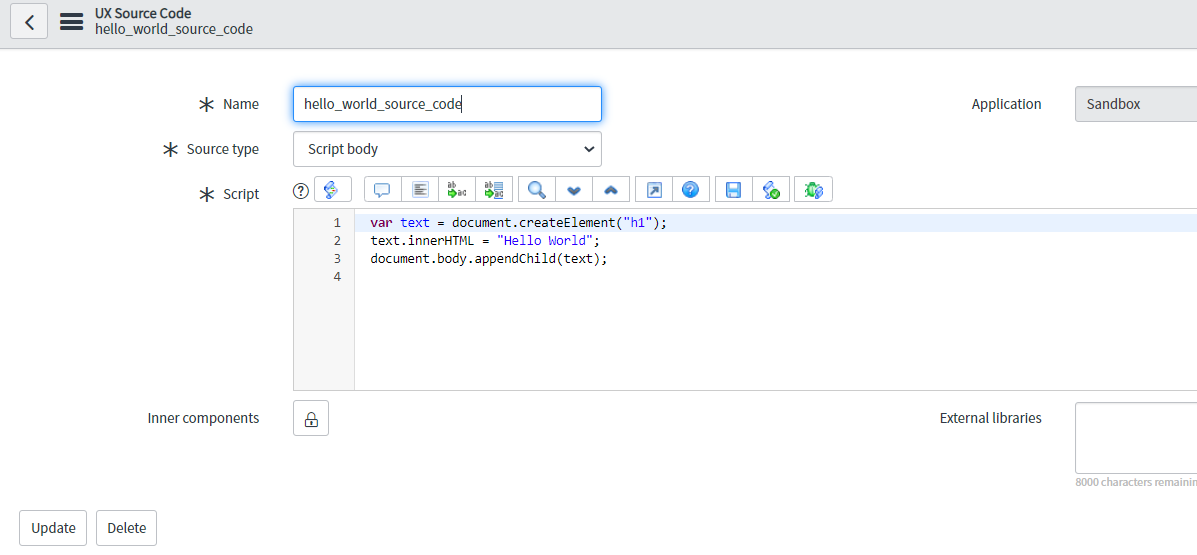
Step #2. Create a new source script
A new record in sys_ux_lib_source_script table. Here we are adding a h1 element and putting “helloworld” text inside it.
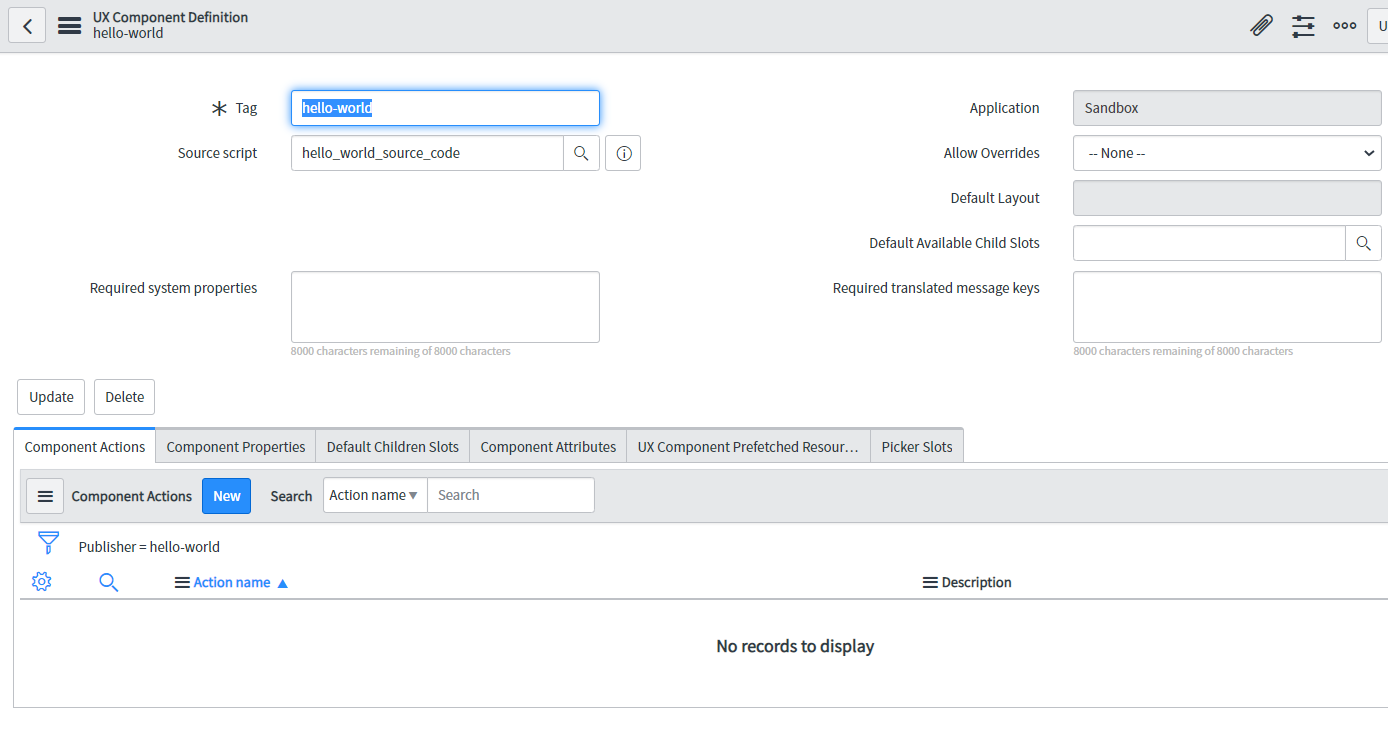
Step #3. Create a component definition for a new component
A new record in sys_ux_lib_component table, pick the component from step #2 as a source script:
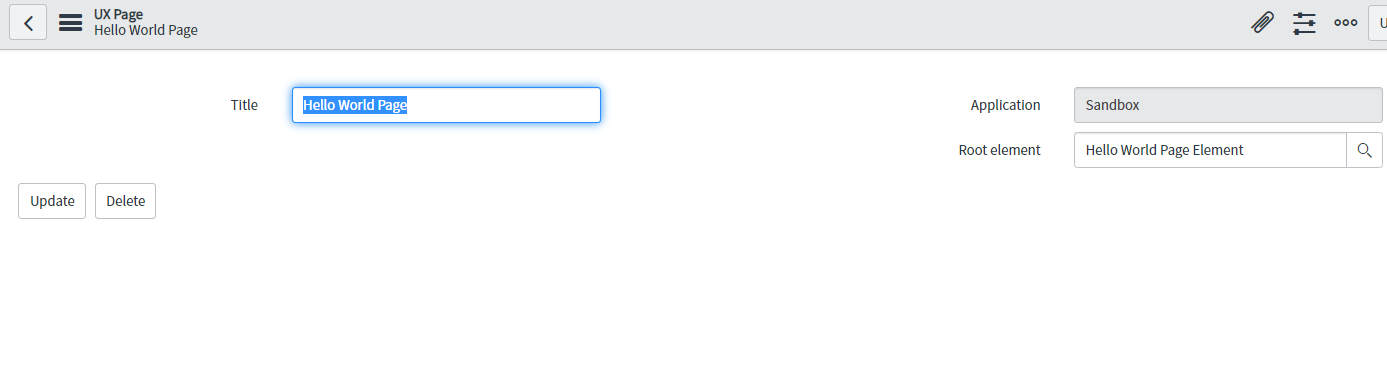
Step #4. Create a page
A new record in sys_ux_page table:

Here we are going to attach the root element. Let’s create the root Page element (sys_ux_page_element) below.
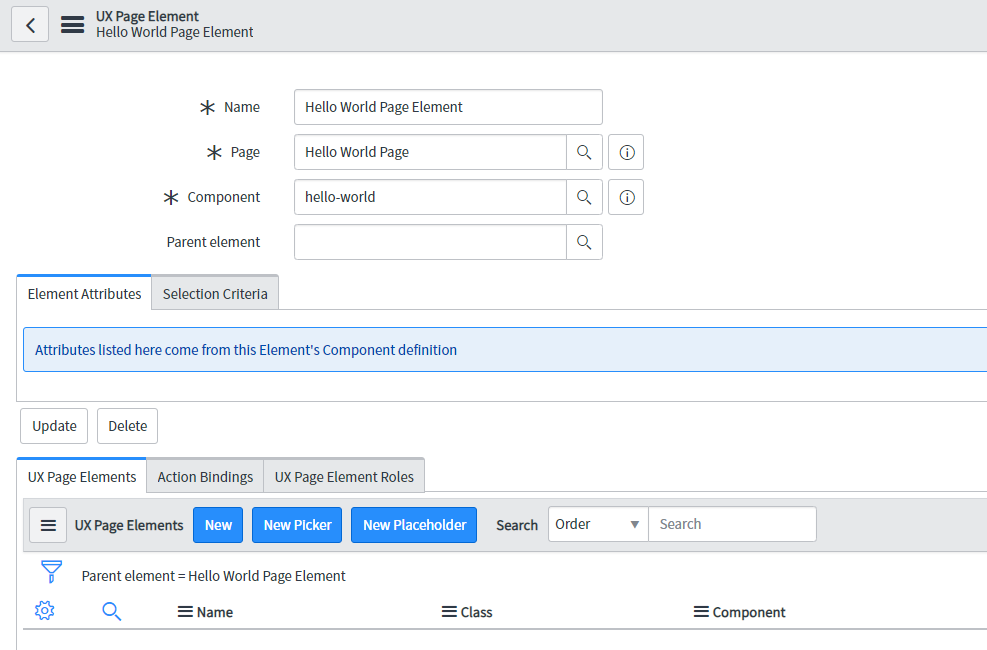
Now we go back to the UX page and pick UX page element we just created as a Root Element:
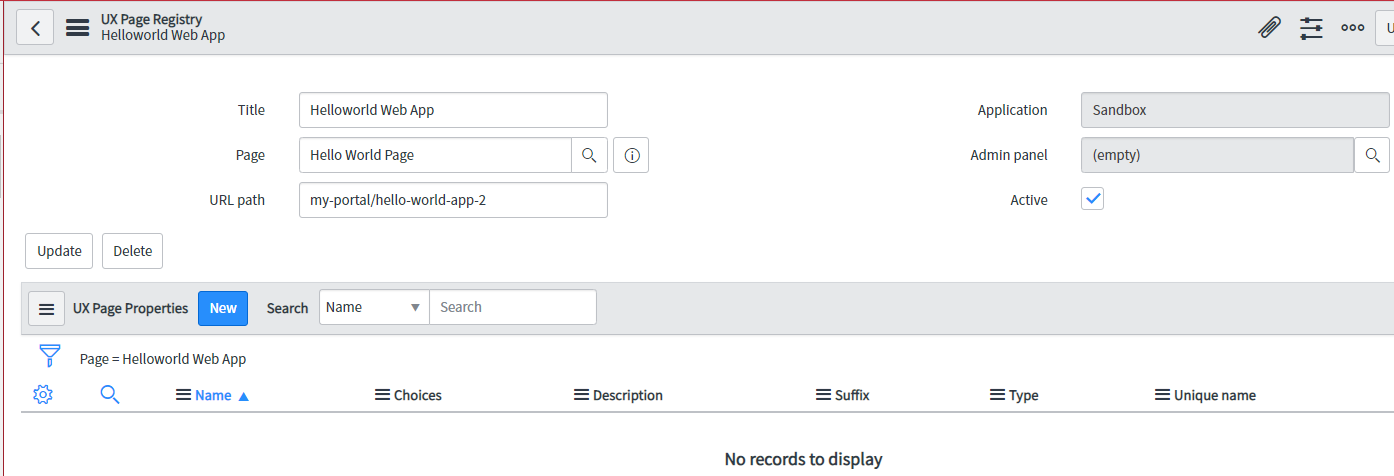
Step #5. Create a new page registry — A new record in sys_ux_page_registry table. There 2 vital fields here
• URL Path: This can be anything, any path is fine. Note that the path we mention here will be used as reference during ACL recreation.
• Page: This the UX page we created earlier. Basically we are binding the uxpage to the url above.
Now we can access the URL as below
https://dev123.service-now.com/x/<companycode>/my-portal/hello-world-app-2
Where:
x stands for custom scope. Note: The core sn modules have scope “now”. Like /now/WorkSpace/agent
companycode: Is the global company code, this can be found in glide.appcreator.company.code in property table
The last 2 segments of the url is what we registered in step5 url path.
Step #6
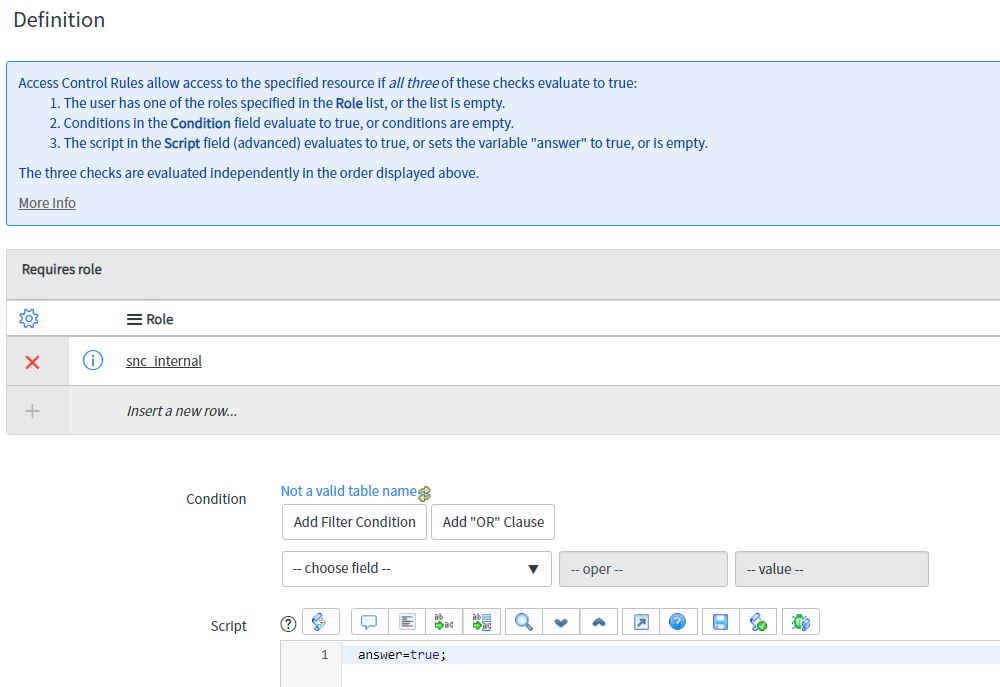
Now we have to apply the ACL.
Goto sys_security_acl table and create a new record .The type will be ux_page.The most important part here is the “Name” field.
The Name field is hybrid field it can acts as reference field as well as plain text field. We are going to use as plain text field and provide the full path of the url we create in Step5.
Format to follow
Suppose our url is :
<snowinstance>/x/<companycode>/my-portal/hello-world-app-2
Then the transformed Name will be
x.<companycode>.my-portal.hello-world-app-2
Observe that here “/” gets replaced with “.”.
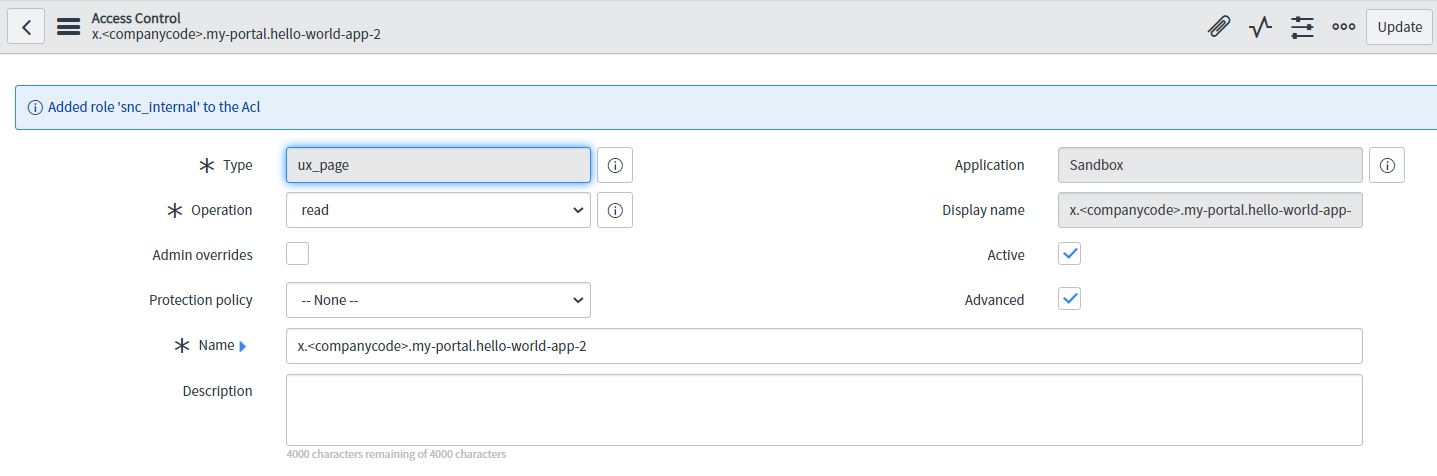
Note: ServiceNow will not validated if we give wrong url here. Our acl will not just work. So we have to carefully give the correct format.
- Understanding Request, RITM, Task in ServiceNow
- Steps to create a case in ServiceNow (CSM)
- Performance Analytics in 10 mins
- Event Management in 10 minutes - part1
- Event Management in 10 minutes - part2
- Custom Lookup List
- Script includes in 5 minutes
- Interactive Filter in 5 minutes
- UI Policy in 6 Minutes
- Client Side Script Versus Server Side Script in 3 minutes
-
Snow
- Performance Analytics
- ServiceNow Scripts
- Script include
- Useful scripts
- Basic Glide Scripts
- Client Script
- Advance Glide Script
- Glide System Script
- Admin
- Import Set
- Work Flow
- ACL
- SLA
- Notification
- Core Application
- UI Policy
- UI Action
- Client Script
- CAB Workbech
- Data Policy
- Connect Support
- Catalog
- Discovery
- CSM
- Event Management
- HR
- Integrations
- SSO Integration
- LDAP Integration
- SCCM Integration
- AWS Intergration
- Slack Integration
- CTI Integration
- Jira Integration
- Ebonding ServiceNow
- SOAP Integration
- IBM Netcool Integration
- VIP Mobile App Integration
- Rest Integration
- Service Portal
- Questions
- ACL
- Performance analytics(PA) Interactive Filter
- Various Configurations in Performance analytics(PA)
- Service Portal
- Performance Analytics(PA) Widgets
- Performance Analytics(PA) Indicator
- Performance Analytics(PA) Buckets
- Performance Analytics(PA) Automated Breakdown
- Client Script
- Rest Integration
- Understanding the Request, RITM, Task
- Service Catalogs
- Events in ServiceNow
- Advance glide script in ServiceNow
- CAB Workbench
Author
Chandrima
With 9+ years of ITSM development experience,Chandrima likes to deep dive ServiceNow modules.She have extensively worked on PA,Service Portal,Event management.
Comments